.Net으로 솔리드웍스 앱 만들기 Chapter-2
본 게시글은 지난 내용에서 이어진다.
지난 시간에 앱을 만들기 위한 기초를 구현하였으니, 이번에는 실제 솔리드웍스 API를 사용하여
솔리드웍스 애드온을 만들어보자
이번에 해볼 것은 속성과 파일 명을 추출하고 속성 내용을 변경해보는 것을 구현해볼 것이다.
우선 완성 코드를 제공하고 코드 내용을 설명하는 방식으로 설명을 진행하겠다.
~목차
1. 준비 -1 프로그램 준비
2. 준비 - 2 파일 준비
3. 준비 - 3 프로그램 구동 확인
4. 코드 구조 살펴보기
5. 코드 기능 및 API 살펴보기
6. API 자습하기
예시용 솔리드웍스 파일
예시용 프로그램
1. 준비 - 1 프로그램 준비
본격적으로 시작하기에 앞서서 먼저 프로젝트를 만들 준비를 하자
본 프로그램은 MVVM 패턴에 따라 프로그램을 만들 예정이다.
다소 번거롭고 시간을 잡아먹긴 하지만, 추후 유지 보수를 위해 패턴을 도입해서 작성해보자
우선 파일 구조다.

보시다시피 View, ViewModel, Model로 나뉘었으며, 이 중 어느것에도 속하기 애매한 것은 Functions으로 분류할 것이다.
(단, 여기서는 Functions 폴더를 사실상 사용하지 않는다.)
각 파일의 MD는 모델, VM은 뷰모델, EW는 뷰의 약자로 사용했다.
RelayCommand의 경우, 거의 모든 뷰모델에서 사용할 파일이니 명명 규칙에서 예외로 하였으며
그 외 별도의 Model 파일은 없다.
(단, 모델로 분류할 수 있는 부분이 있으나 여기서는 그냥 뷰모델로 분류한다. 이유는 후술)
NewWindow은 지난번에 만든 솔리드웍스 왼쪽 창에 추가되는 창이고
이번에 새로 만든 것은 EW_MainFunction이다.
우선 지난번에 만든 파일을 보자
NewWindow.xaml & NewWindow.xaml.cs
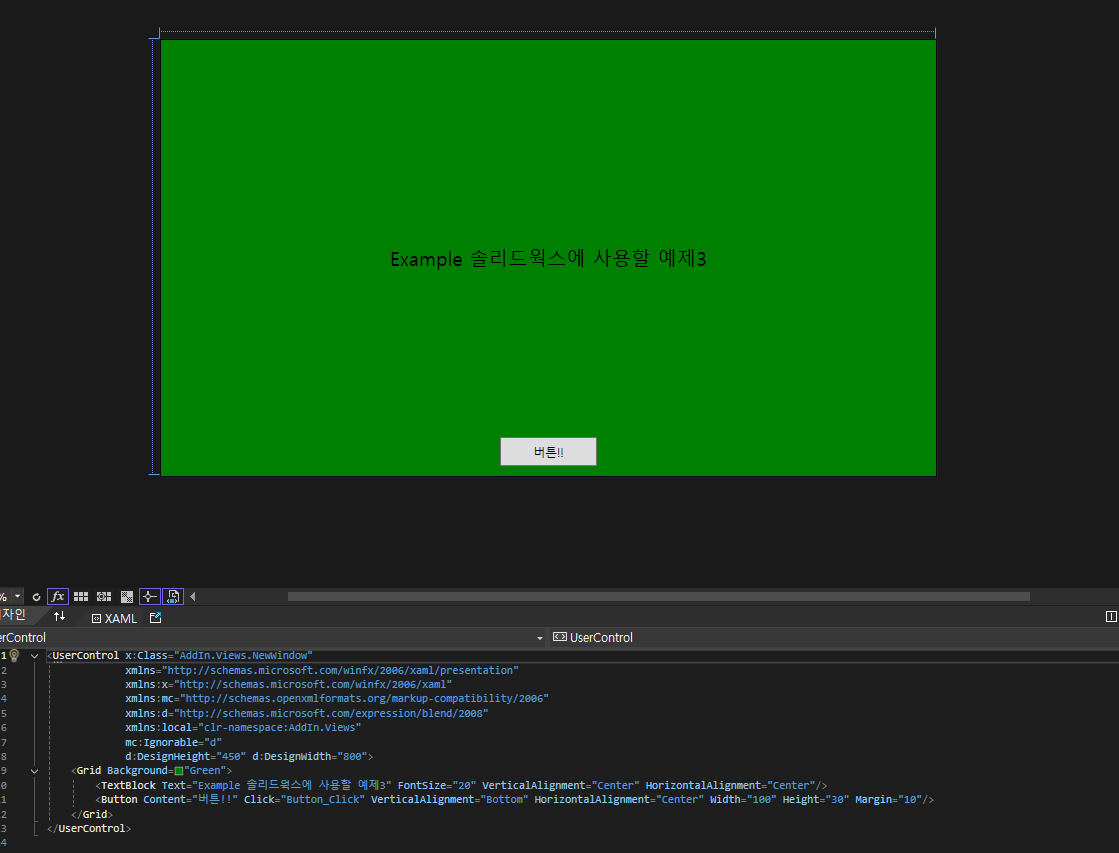
<UserControl x:Class="AddIn.Views.NewWindow"
             xmlns="http://schemas.microsoft.com/winfx/2006/xaml/presentation"
             xmlns:x="http://schemas.microsoft.com/winfx/2006/xaml"
             xmlns:mc="http://schemas.openxmlformats.org/markup-compatibility/2006"
             xmlns:d="http://schemas.microsoft.com/expression/blend/2008"
             xmlns:local="clr-namespace:AddIn.Views"
             mc:Ignorable="d"
             d:DesignHeight="450" d:DesignWidth="800">
    <Grid Background="Green">
        <TextBlock Text="Example 솔리드웍스에 사용할 예제3" FontSize="20" VerticalAlignment="Center" HorizontalAlignment="Center"/>
        <Button Content="버튼!!" Click="Button_Click" VerticalAlignment="Bottom" HorizontalAlignment="Center" Width="100" Height="30" Margin="10"/>
    </Grid>
</UserControl>
보시다시피 별 내용 없다.
다만 달라진 부분이 있다면 아무기능도 없었던 Button에 이벤트를 부여했다.
이제 버튼을 누르면 새로운 창이 뜨도록 이벤트를 부여했으며 이를 위한 비하인드 코드는 다음과 같다.
using System.Windows;
using System.Windows.Controls;

namespace AddIn.Views
{
    /// <summary>
    /// NewWindow.xaml에 대한 상호 작용 논리
    /// </summary>
    public partial class NewWindow : UserControl
    {
        public NewWindow()
        {
            InitializeComponent();
        }

        private void Button_Click(object sender, RoutedEventArgs e)
        {
            EW_MainFunction ew_MainFunction = new EW_MainFunction();
            ew_MainFunction.Show();
        }
    }
}
코드를 보면 버튼을 누르면 EW_MainFunction이 뜨도록 했다.
이번엔 이번 내용의 주 무대인 EW_MainFunction 파일을 살펴보자
EW_MainFunction.xaml & EW_MainFunction.xaml.cs
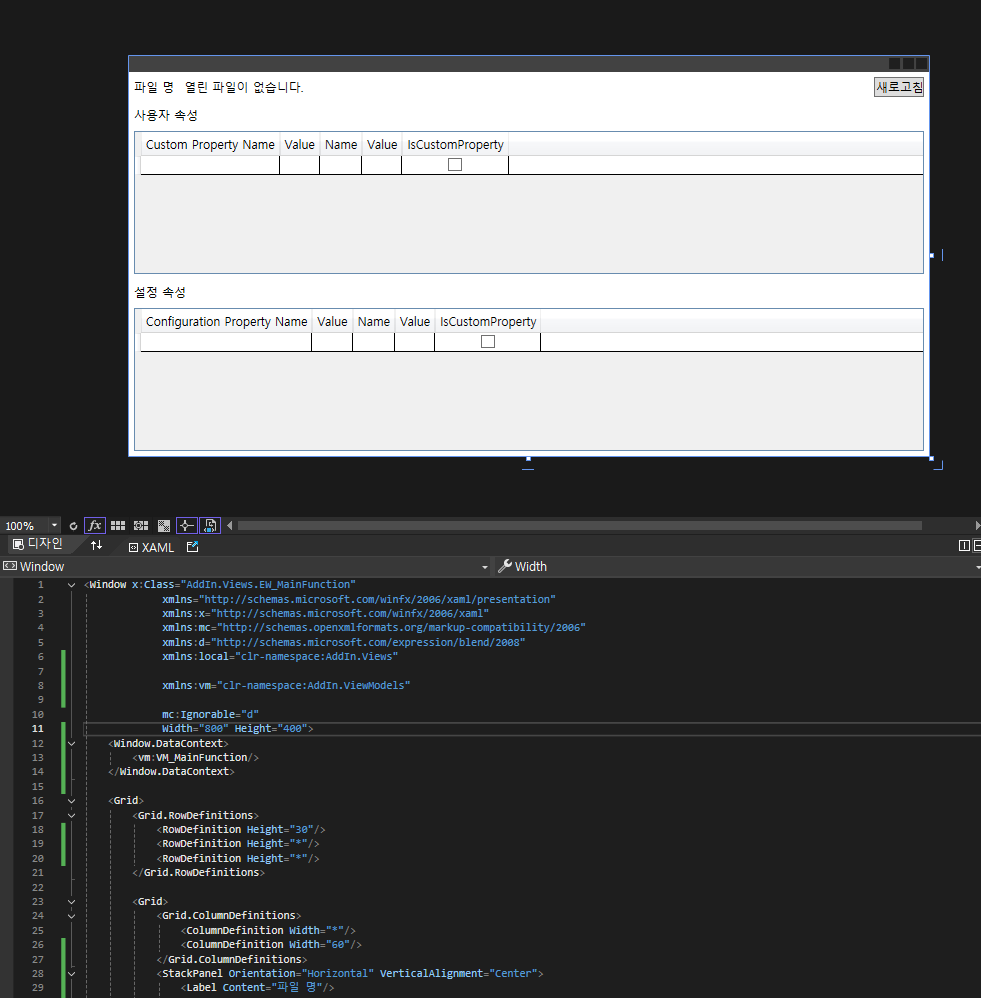
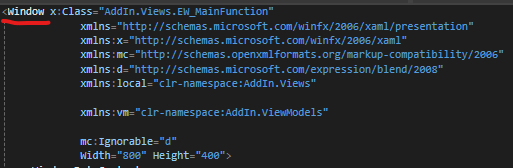
<Window x:Class="AddIn.Views.EW_MainFunction"
xmlns="http://schemas.microsoft.com/winfx/2006/xaml/presentation"
xmlns:x="http://schemas.microsoft.com/winfx/2006/xaml"
xmlns:mc="http://schemas.openxmlformats.org/markup-compatibility/2006"
xmlns:d="http://schemas.microsoft.com/expression/blend/2008"
xmlns:local="clr-namespace:AddIn.Views"
xmlns:vm="clr-namespace:AddIn.ViewModels"
mc:Ignorable="d"
Width="800" Height="400">
<Window.DataContext>
<vm:VM_MainFunction/>
</Window.DataContext>
<Grid>
<Grid.RowDefinitions>
<RowDefinition Height="30"/>
<RowDefinition Height="*"/>
<RowDefinition Height="*"/>
</Grid.RowDefinitions>
<Grid>
<Grid.ColumnDefinitions>
<ColumnDefinition Width="*"/>
<ColumnDefinition Width="60"/>
</Grid.ColumnDefinitions>
<StackPanel Orientation="Horizontal" VerticalAlignment="Center">
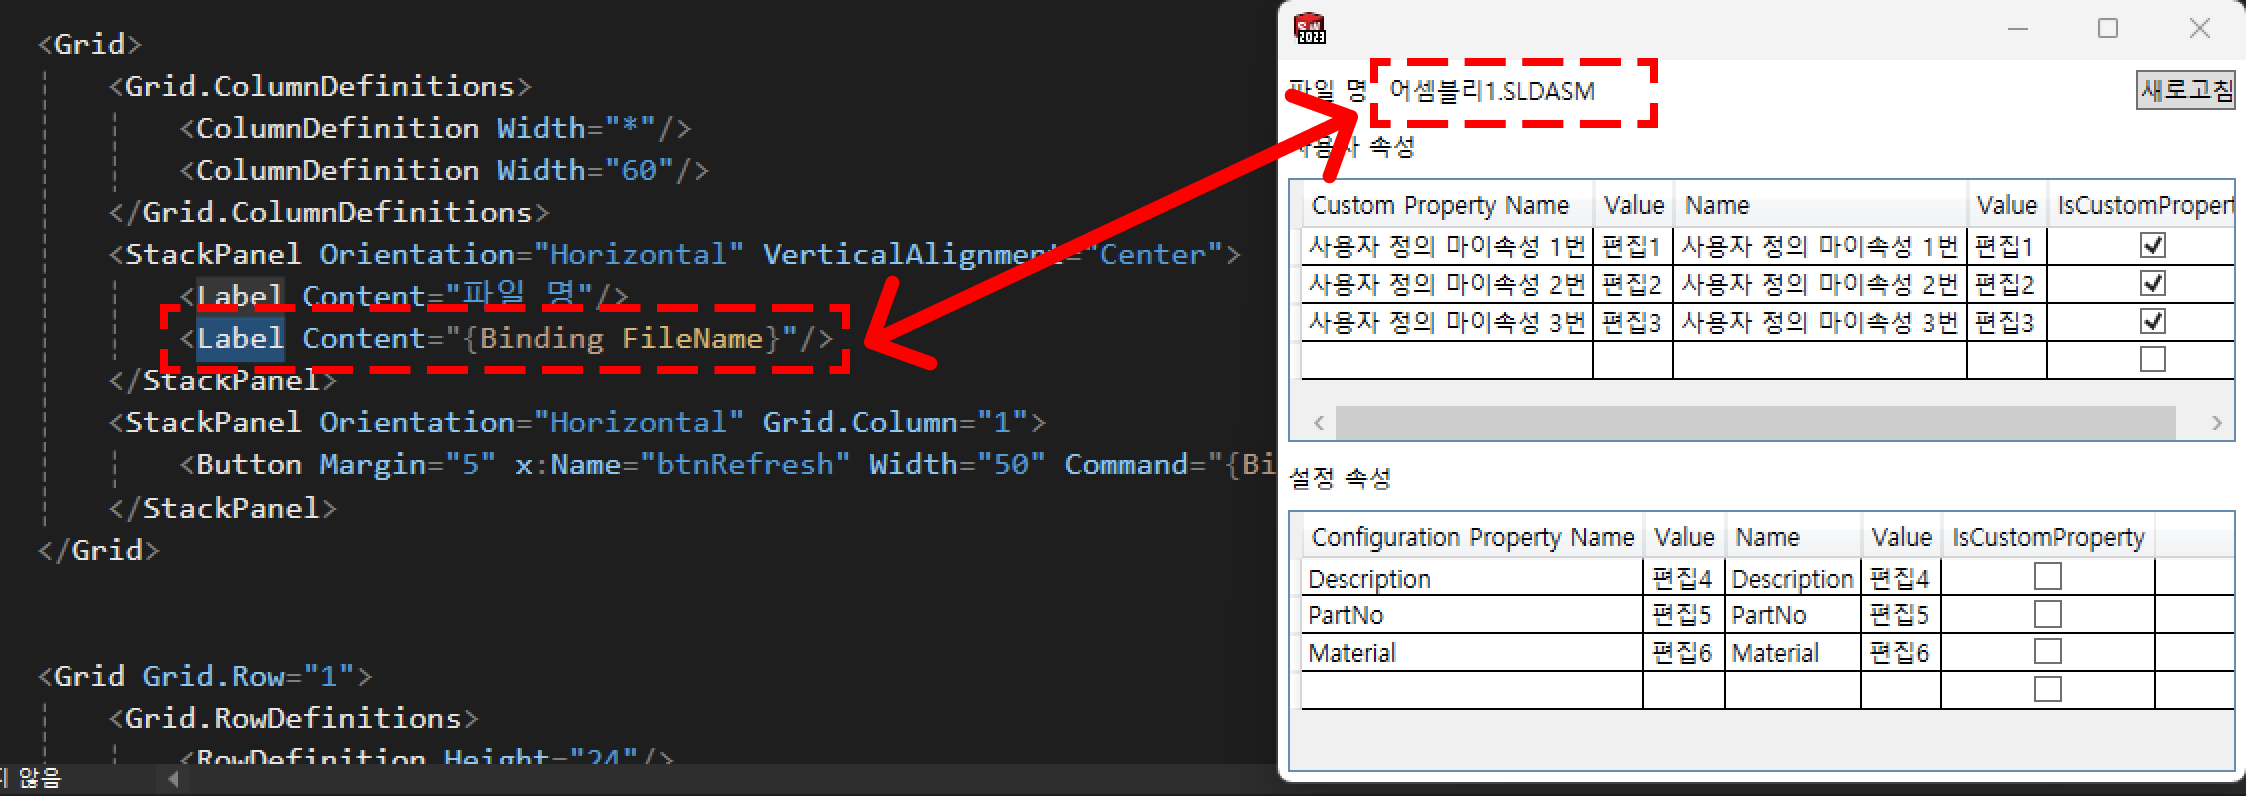
<Label Content="파일 명"/>
<Label Content="{Binding FileName}"/>
</StackPanel>
<StackPanel Orientation="Horizontal" Grid.Column="1">
<Button Margin="5" x:Name="btnRefresh" Width="50" Command="{Binding RefreshCommand}" Content="새로고침"/>
</StackPanel>
</Grid>
<Grid Grid.Row="1">
<Grid.RowDefinitions>
<RowDefinition Height="24"/>
<RowDefinition Height="*"/>
</Grid.RowDefinitions>
<Label Content="사용자 속성"/>
<DataGrid x:Name="dgdCustomProperties" Grid.Row="1" Margin="5" AutoGenerateColumns="True" HorizontalAlignment="Stretch" VerticalAlignment="Stretch" ItemsSource="{Binding CustomProperties}">
<DataGrid.Columns>
<DataGridTextColumn Header="Custom Property Name" Binding="{Binding Name}" IsReadOnly="True"/>
<DataGridTextColumn Header="Value" Binding="{Binding Value, UpdateSourceTrigger=PropertyChanged}" />
</DataGrid.Columns>
</DataGrid>
</Grid>
<Grid Grid.Row="2">
<Grid.RowDefinitions>
<RowDefinition Height="24"/>
<RowDefinition Height="*"/>
</Grid.RowDefinitions>
<Label Content="설정 속성"/>
<DataGrid x:Name="dgdConfigurationProperties" Grid.Row="1" Margin="5" AutoGenerateColumns="True" HorizontalAlignment="Stretch" VerticalAlignment="Stretch" ItemsSource="{Binding ConfigurationProperties}">
<DataGrid.Columns>
<DataGridTextColumn Header="Configuration Property Name" Binding="{Binding Name}" IsReadOnly="True"/>
<DataGridTextColumn Header="Value" Binding="{Binding Value, UpdateSourceTrigger=PropertyChanged}" />
</DataGrid.Columns>
</DataGrid>
</Grid>
</Grid>
</Window>
using System.Windows;

namespace AddIn.Views
{
    public partial class EW_MainFunction : Window
    {
        public EW_MainFunction()
        {
            InitializeComponent();
        }
    }
}
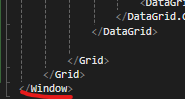
xaml의 코드가 제법 길다.
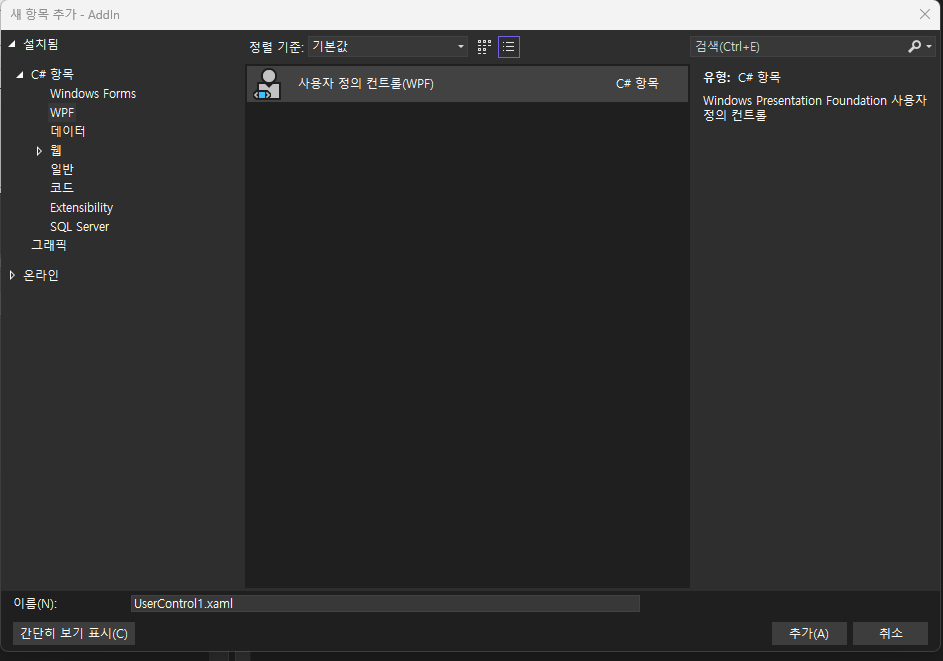
본 코드를 작성할 때 주의할 사항은 코드의 첫부분이 UserControl이 아닌 Window로 시작한다는 것이다.
비주얼 스튜디오에서 xaml 파일을 생성할때 UserControl로 생성하고 헤더를 Window로 바꾸면 된다.
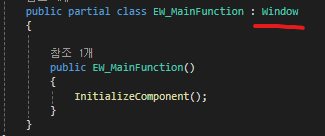
주의! 비하인드 코드에서도 UserControl을 Window로 바꿔주어야 한다.
 |
 |
VM_MainFunction.cs
뷰를 살펴보았으니 이번엔 뷰모델 코드를 살펴보자
using AddIn.Models;
using SolidWorks.Interop.sldworks;
using System.Collections.ObjectModel;
using System.ComponentModel;
using System.Runtime.CompilerServices;
using System.Windows.Input;
namespace AddIn.ViewModels
{
public class VM_MainFunction : INotifyPropertyChanged
{
// 데이터 영역
private string _fileName;
public string FileName
{
get { return _fileName; }
set { _fileName = value; OnPropertyChanged(); }
}
private ObservableCollection<PropertyItem> _customProperties;
public ObservableCollection<PropertyItem> CustomProperties
{
get { return _customProperties; }
set { _customProperties = value; OnPropertyChanged(); }
}
private ObservableCollection<PropertyItem> _configurationProperties;
public ObservableCollection<PropertyItem> ConfigurationProperties
{
get { return _configurationProperties; }
set { _configurationProperties = value; OnPropertyChanged(); }
}
// 커멘드 영역
public ICommand RefreshCommand { get; }
// 생성자
public VM_MainFunction()
{
CustomProperties = new ObservableCollection<PropertyItem>();
ConfigurationProperties = new ObservableCollection<PropertyItem>();
RefreshCommand = new RelayCommand(GetProperties);
GetProperties();
}
// 속성 가져오기 (사용자, 설정 둘 다)
private void GetProperties()
{
SldWorks swApp = new SldWorks();
ModelDoc2 swModel = (ModelDoc2)swApp.ActiveDoc;
if (swModel != null)
{
FileName = swModel.GetTitle();
CustomProperties.Clear();
ConfigurationProperties.Clear();
// 커스텀 속성 가져오기
CustomPropertyManager customPropMgr = swModel.Extension.CustomPropertyManager[""];
string[] customPropNames = customPropMgr.GetNames();
foreach (string propName in customPropNames)
{
string valOut;
string resolvedValOut;
customPropMgr.Get2(propName, out valOut, out resolvedValOut);
CustomProperties.Add(new PropertyItem { Name = propName, Value = resolvedValOut, IsCustomProperty = true });
}
// 설정 속성 가져오기
ConfigurationManager configMgr = swModel.ConfigurationManager;
Configuration config = configMgr.ActiveConfiguration;
CustomPropertyManager configPropMgr = config.CustomPropertyManager;
string[] configPropNames = configPropMgr.GetNames();
foreach (string propName in configPropNames)
{
string valOut;
string resolvedValOut;
configPropMgr.Get2(propName, out valOut, out resolvedValOut);
ConfigurationProperties.Add(new PropertyItem { Name = propName, Value = resolvedValOut, IsCustomProperty = false });
}
}
else
{
FileName = "열린 파일이 없습니다.";
}
}
public event PropertyChangedEventHandler PropertyChanged;
protected void OnPropertyChanged([CallerMemberName] string propertyName = null)
{
PropertyChanged?.Invoke(this, new PropertyChangedEventArgs(propertyName));
}
}
public class PropertyItem : INotifyPropertyChanged
{
private string _name;
public string Name
{
get { return _name; }
set { _name = value; OnPropertyChanged(); }
}
private string _value;
public string Value
{
get { return _value; }
set
{
_value = value;
OnPropertyChanged();
UpdateProperty();
}
}
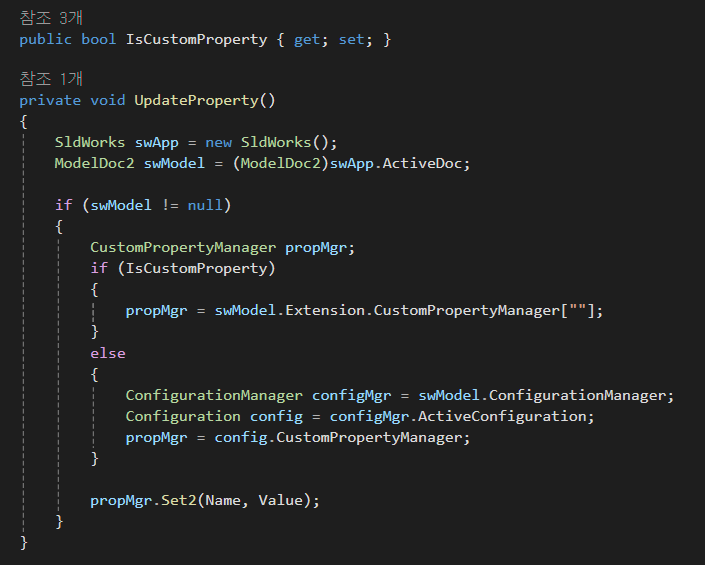
public bool IsCustomProperty { get; set; }
private void UpdateProperty()
{
SldWorks swApp = new SldWorks();
ModelDoc2 swModel = (ModelDoc2)swApp.ActiveDoc;
if (swModel != null)
{
CustomPropertyManager propMgr;
if (IsCustomProperty)
{
propMgr = swModel.Extension.CustomPropertyManager[""];
}
else
{
ConfigurationManager configMgr = swModel.ConfigurationManager;
Configuration config = configMgr.ActiveConfiguration;
propMgr = config.CustomPropertyManager;
}
propMgr.Set2(Name, Value);
}
}
public event PropertyChangedEventHandler PropertyChanged;
protected void OnPropertyChanged([CallerMemberName] string propertyName = null)
{
PropertyChanged?.Invoke(this, new PropertyChangedEventArgs(propertyName));
}
}
}
모든 기능이 이곳에 정의되어 있다.
PropertyItem의 경우, 일부 수정하여 모델에 작성해도 되지만 엄연히 UI와 직접 상호작용하도록 코드를 작성했기에 뷰 모델에 포함시키는 것이 맞다고 판단하여 뷰 모델에 작성했다.
물론 뷰와의 상호작용을 VM_MainFunction 에 다 때려박고 PropertyItem을 모델로 분류해도 된다.
다만 여기서는 뷰모델로 사용하겠다.
이제 Relay_Command를 보자
Relay_Command.cs
using System;
using System.Windows.Input;

namespace AddIn.Models
{
    public class RelayCommand : ICommand
    {
        private readonly Action _execute;
        private readonly Func<bool> _canExecute;

        public RelayCommand(Action execute, Func<bool> canExecute = null)
        {
            _execute = execute ?? throw new ArgumentNullException(nameof(execute));
            _canExecute = canExecute;
        }

        public bool CanExecute(object parameter)
        {
            return _canExecute == null || _canExecute();
        }

        public void Execute(object parameter)
        {
            _execute();
        }

        public event EventHandler CanExecuteChanged
        {
            add { CommandManager.RequerySuggested += value; }
            remove { CommandManager.RequerySuggested -= value; }
        }
    }
}
MVVM에서 바인딩을 위해 사실상 필수적으로 사용하는 코드
필요에 따라 얼마든지 RelayCommand 내용을 추가할 수 있다, 아래는 추가한 예시
public class RelayCommand<T> : ICommand
{
    private readonly Action<T> _execute;

    public RelayCommand(Action<T> execute)
    {
        _execute = execute;
    }

    public bool CanExecute(object parameter) => true;

    public void Execute(object parameter) => _execute((T)parameter);

    public event EventHandler CanExecuteChanged;
}
이건 예시 코드일 뿐이므로 사용할 필요 없다.
만약 RelayCommand에 파라미터를 넣고자 한다면 이런식으로 추가한다는 예시일 뿐이다.
1. 준비 - 2 파일 준비
이번에는 이번 예시에서 사용할 파일을 둘러보자
파일 자체는 첨부해놓았으니 참조 바란다.
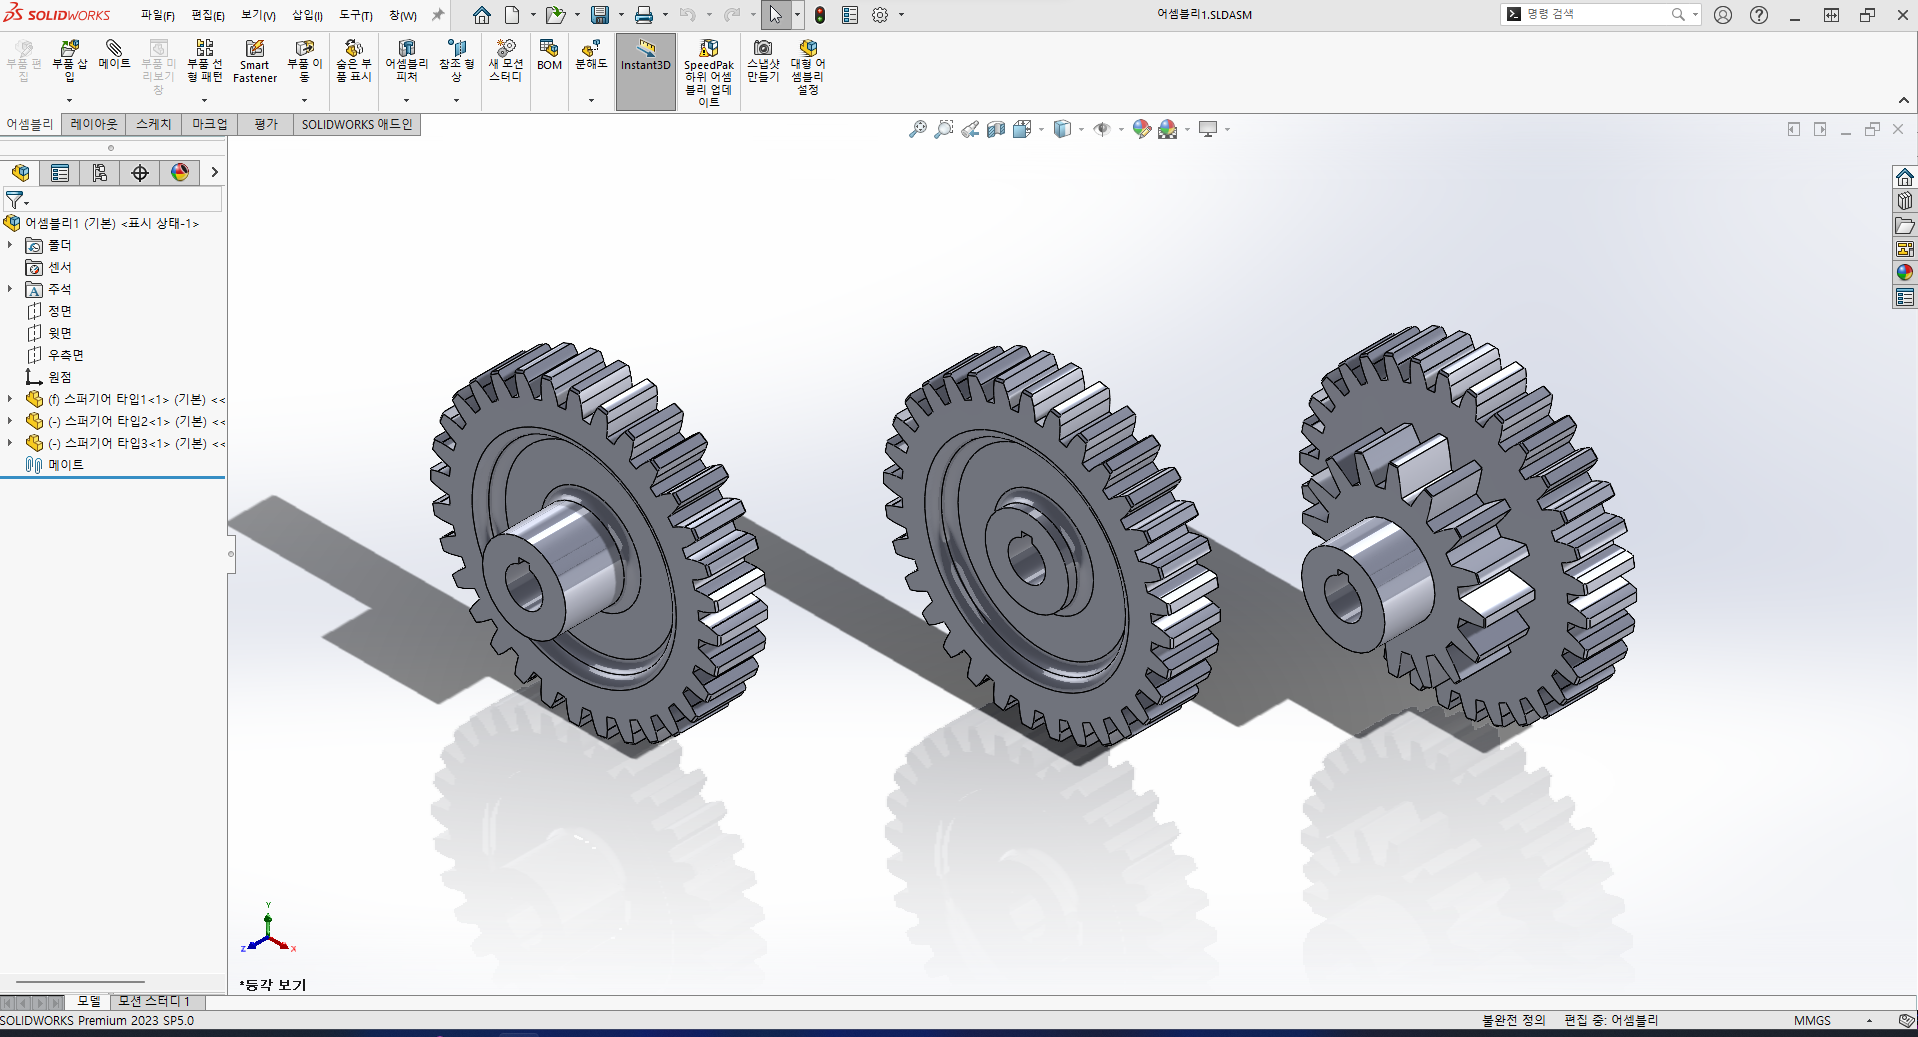
이번에 사용할 어셈블리 파일
어셈블리라고 하기도 뭐하지만 아무튼 3개의 부품 파일로 구성되어 있다.
이 파일의 속성을 확인해보자
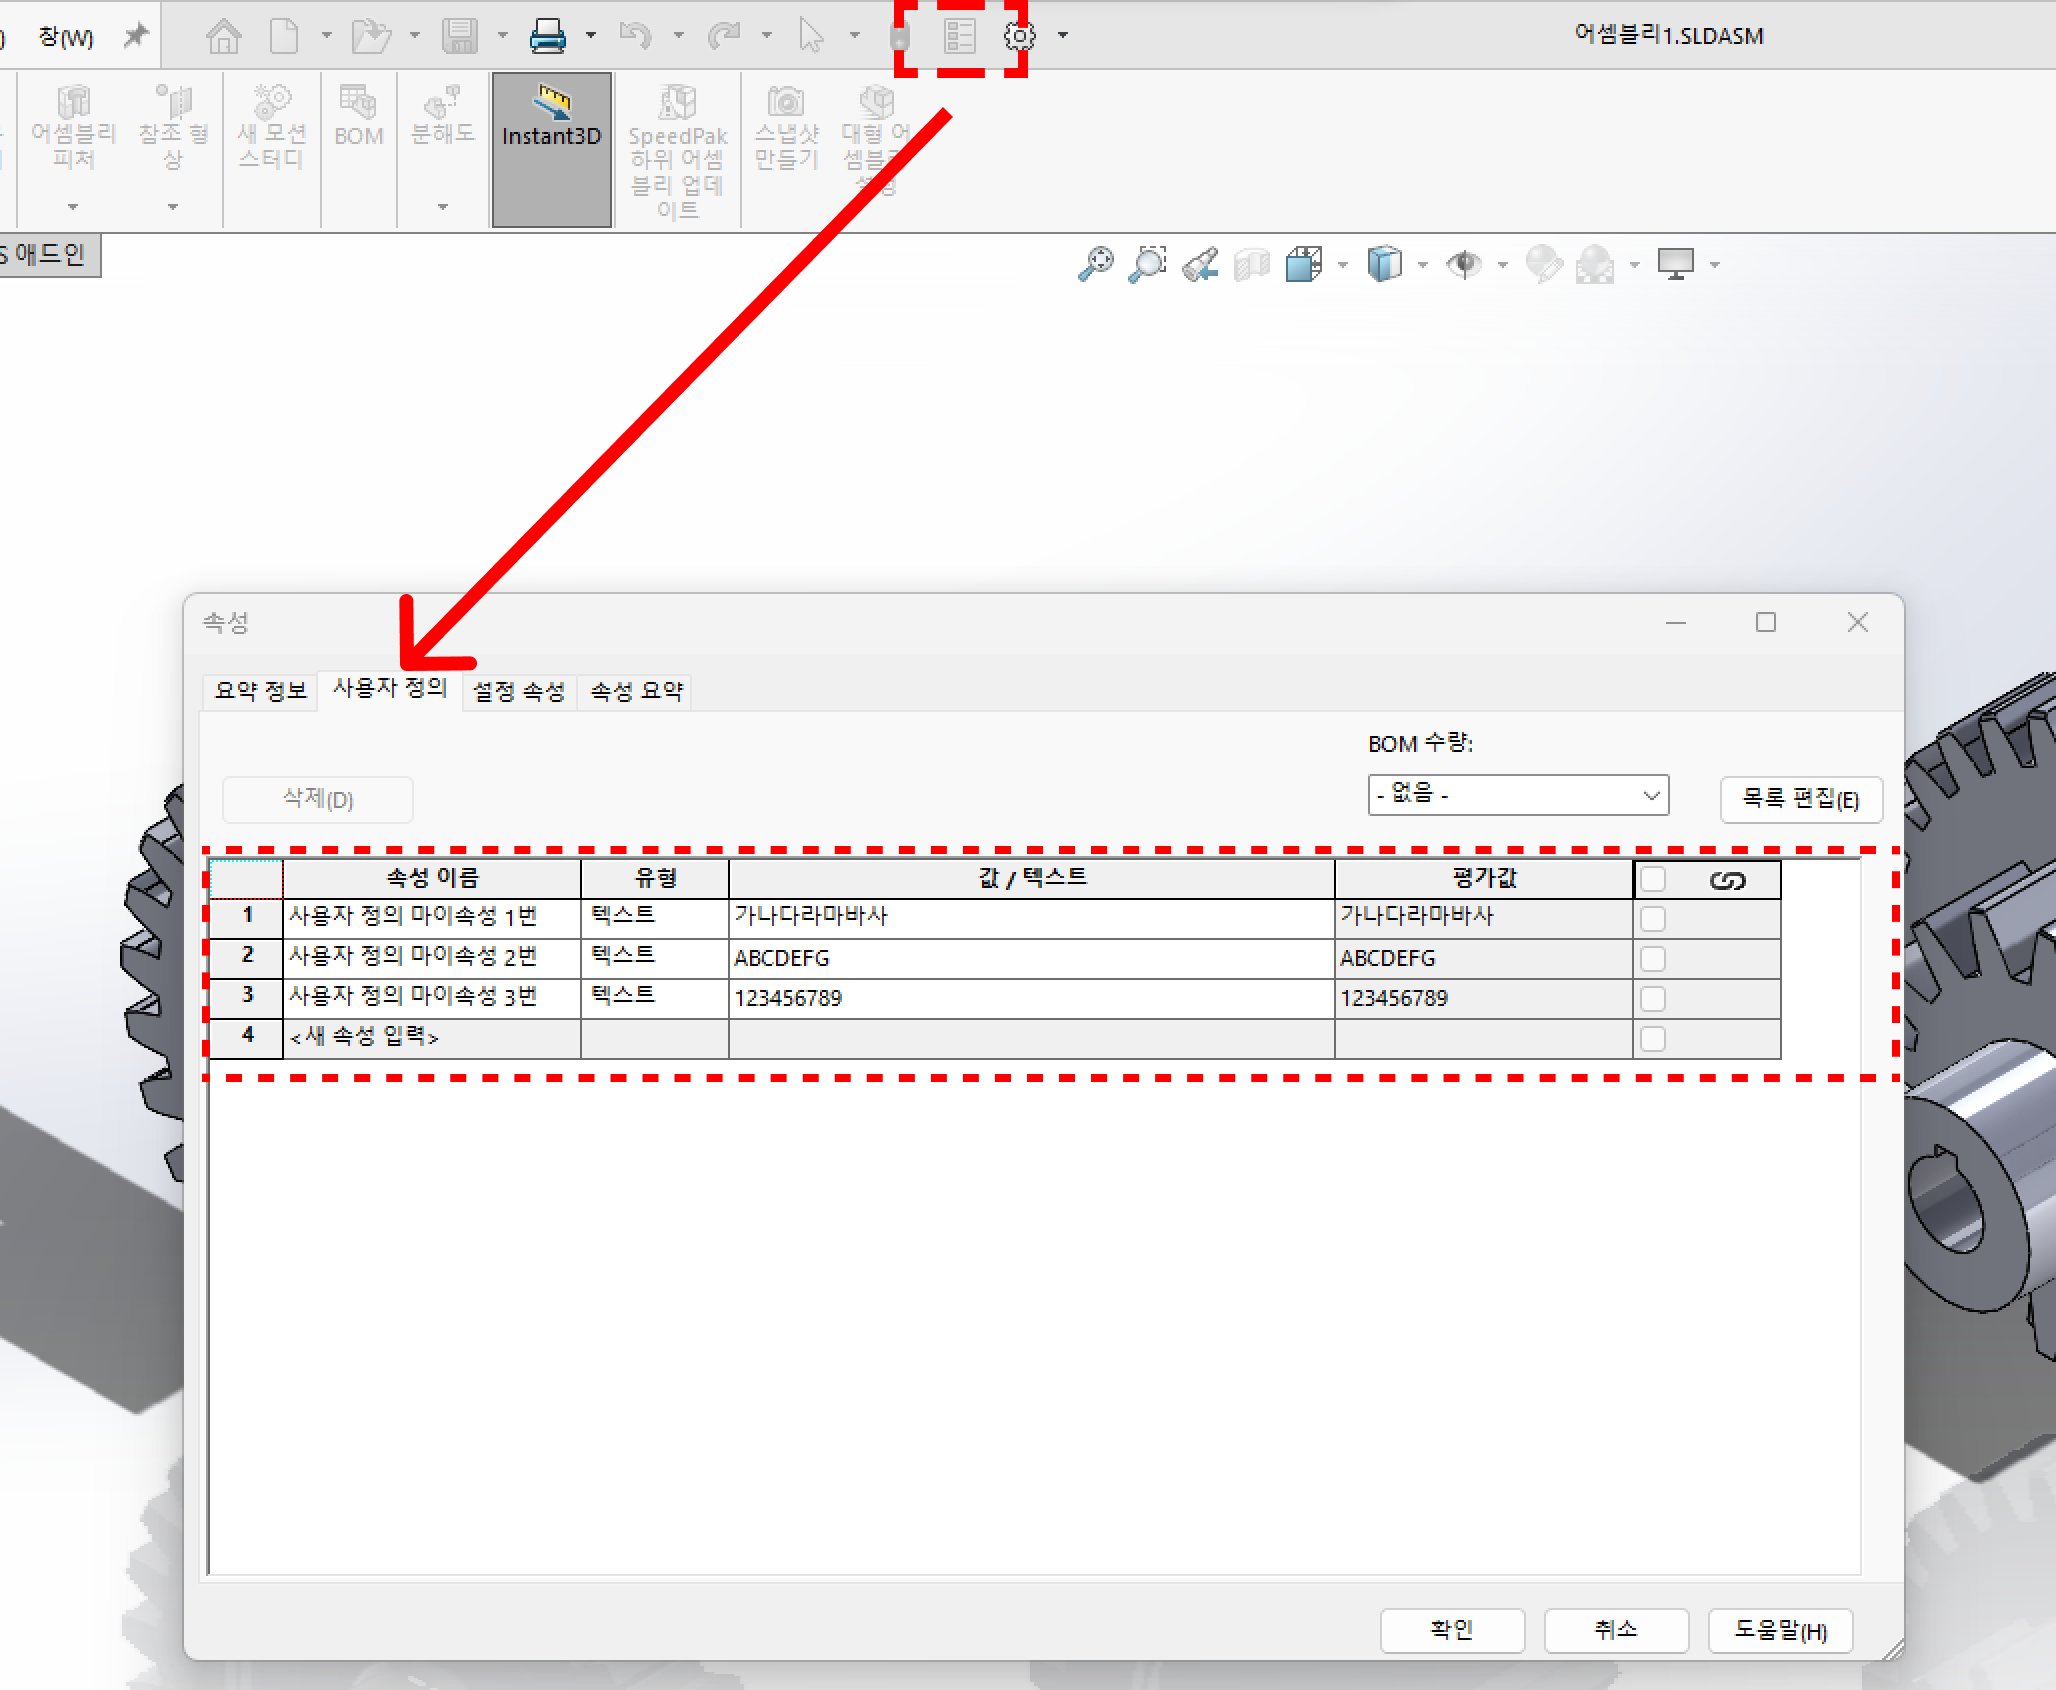
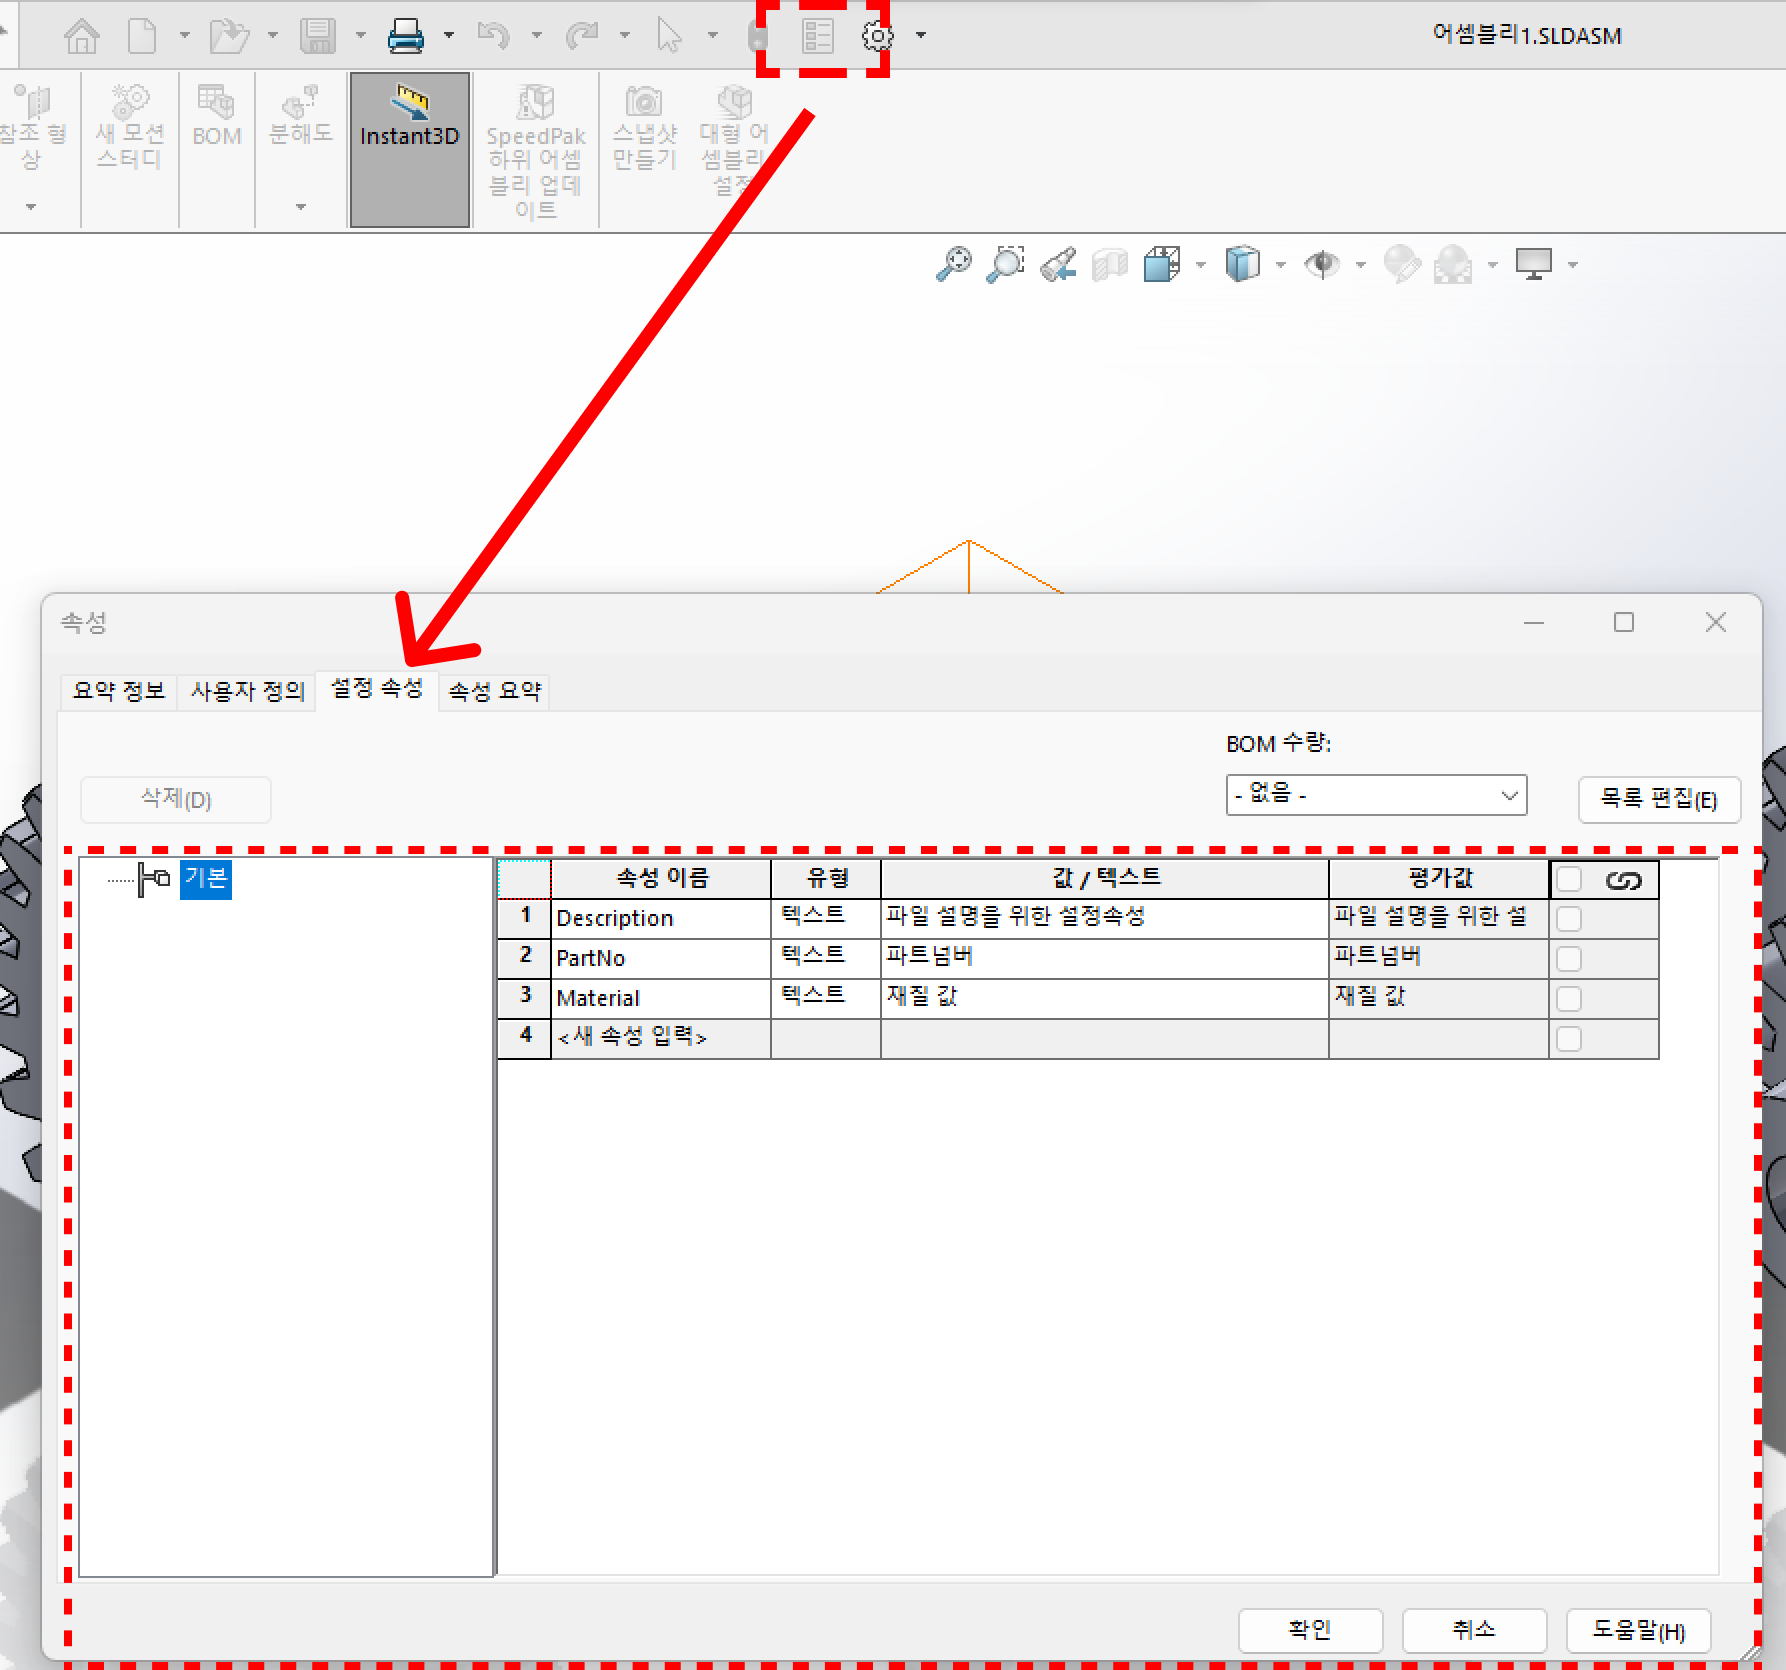
사진상에는 버튼이 비활성화 되어 있지만 원래 창을 띄우면 저렇게 비활성화 된다.
아무튼 파일 내 사용자 정의와 설정 속성에는 내가 임의로 넣은 값이 들어가 있는 것을 볼 수 있다.
3. 준비 - 3 프로그램 구동 확인
마지막으로 프로그램의 구동을 확인해보자

지난 시간에 알려준것 처럼 애드온을 추가하고 버튼을 눌러서 창을 띄워보자
창을 띄우는 순간, 파일명이 들어오고 사용자 속성과 설정 속성들이 추가된 것을 알 수 있다.
이제 이 내용을 편집해보자
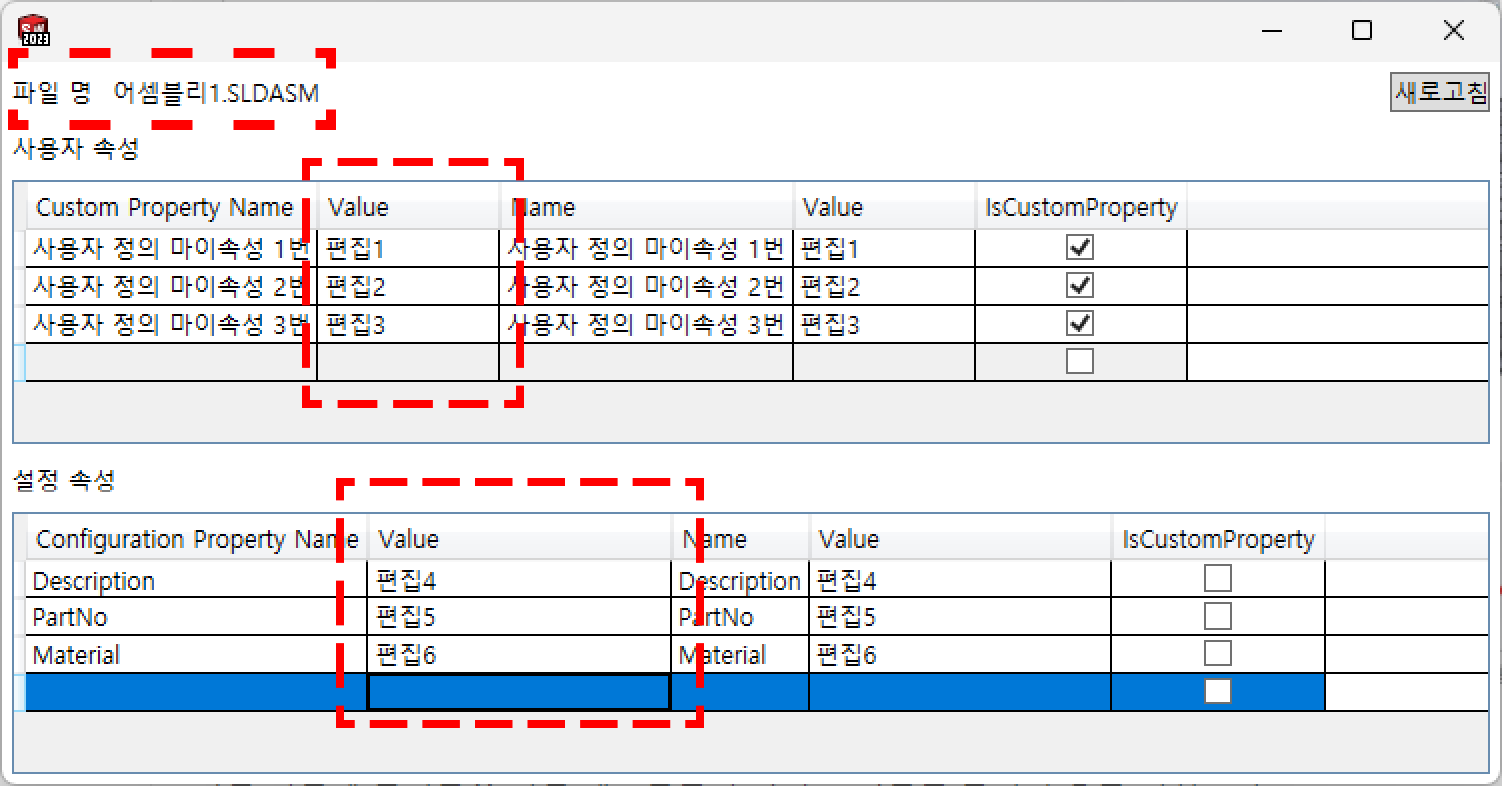
내용을 이와 같이 편집했다.
(단, Value가 두곳에 표시되어 있는데 어느쪽을 고쳐도 알아서 상대쪽에 적용된다.)
이제 과연 잘 적용 되었는지 확인해보자
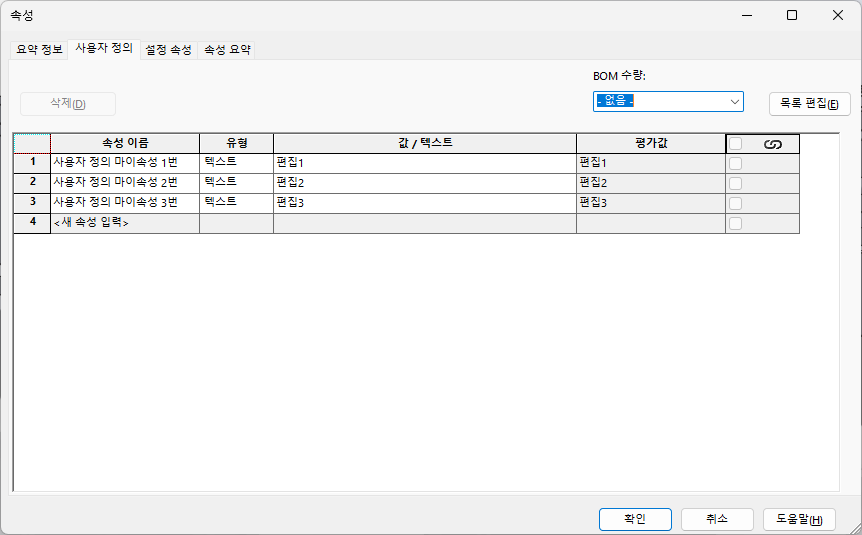
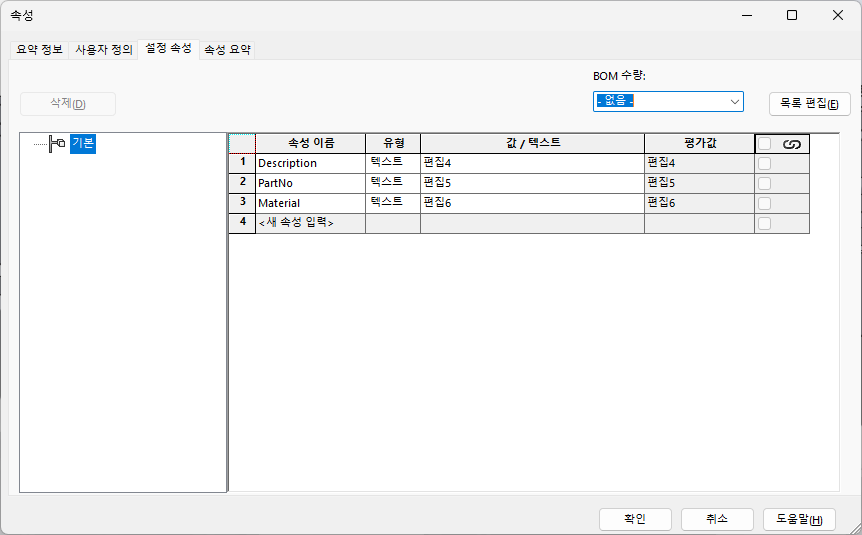
앞서 알려준대로 사용자 정의 값과 설정 속성에 들어가보니 값이 변해 있는 것을 알 수 있다.
4. 코드 구조 살펴보기
이제 코드를 살펴보자
중요한건 뷰모델 파일 안에 다 있기 때문에 해당 내용만 살펴볼 것이다.
이미 한 번 올렸었지만, 가장 중요한 부분인 만큼 다시한번 살펴보자
using AddIn.Models;
using SolidWorks.Interop.sldworks;
using System.Collections.ObjectModel;
using System.ComponentModel;
using System.Runtime.CompilerServices;
using System.Windows.Input;

namespace AddIn.ViewModels
{
    public class VM_MainFunction : INotifyPropertyChanged
    {
        // 데이터 영역
        private string _fileName;
        public string FileName
        {
            get { return _fileName; }
            set { _fileName = value; OnPropertyChanged(); }
        }

        private ObservableCollection<PropertyItem> _customProperties;
        public ObservableCollection<PropertyItem> CustomProperties
        {
            get { return _customProperties; }
            set { _customProperties = value; OnPropertyChanged(); }
        }

        private ObservableCollection<PropertyItem> _configurationProperties;
        public ObservableCollection<PropertyItem> ConfigurationProperties
        {
            get { return _configurationProperties; }
            set { _configurationProperties = value; OnPropertyChanged(); }
        }

        // 커멘드 영역
        public ICommand RefreshCommand { get; }

        // 생성자
        public VM_MainFunction()
        {
            CustomProperties = new ObservableCollection<PropertyItem>();
            ConfigurationProperties = new ObservableCollection<PropertyItem>();
            RefreshCommand = new RelayCommand(GetProperties);
            GetProperties();
        }

        // 속성 가져오기 (사용자, 설정 둘 다)
        private void GetProperties()
        {
            SldWorks swApp = new SldWorks();
            ModelDoc2 swModel = (ModelDoc2)swApp.ActiveDoc;

            if (swModel != null)
            {
                FileName = swModel.GetTitle();
                CustomProperties.Clear();
                ConfigurationProperties.Clear();

                // 커스텀 속성 가져오기
                CustomPropertyManager customPropMgr = swModel.Extension.CustomPropertyManager[""];
                string[] customPropNames = customPropMgr.GetNames();
                foreach (string propName in customPropNames)
                {
                    string valOut;
                    string resolvedValOut;
                    customPropMgr.Get2(propName, out valOut, out resolvedValOut);
                    CustomProperties.Add(new PropertyItem { Name = propName, Value = resolvedValOut, IsCustomProperty = true });
                }

                // 설정 속성 가져오기
                ConfigurationManager configMgr = swModel.ConfigurationManager;
                Configuration config = configMgr.ActiveConfiguration;
                CustomPropertyManager configPropMgr = config.CustomPropertyManager;
                string[] configPropNames = configPropMgr.GetNames();
                foreach (string propName in configPropNames)
                {
                    string valOut;
                    string resolvedValOut;
                    configPropMgr.Get2(propName, out valOut, out resolvedValOut);
                    ConfigurationProperties.Add(new PropertyItem { Name = propName, Value = resolvedValOut, IsCustomProperty = false });
                }
            }
            else
            {
                FileName = "열린 파일이 없습니다.";
            }
        }

        public event PropertyChangedEventHandler PropertyChanged;
        protected void OnPropertyChanged([CallerMemberName] string propertyName = null)
        {
            PropertyChanged?.Invoke(this, new PropertyChangedEventArgs(propertyName));
        }
    }

    public class PropertyItem : INotifyPropertyChanged
    {
        private string _name;
        public string Name
        {
            get { return _name; }
            set { _name = value; OnPropertyChanged(); }
        }

        private string _value;
        public string Value
        {
            get { return _value; }
            set
            {
                _value = value;
                OnPropertyChanged();
                UpdateProperty();
            }
        }

        public bool IsCustomProperty { get; set; }

        private void UpdateProperty()
        {
            SldWorks swApp = new SldWorks();
            ModelDoc2 swModel = (ModelDoc2)swApp.ActiveDoc;

            if (swModel != null)
            {
                CustomPropertyManager propMgr;
                if (IsCustomProperty)
                {
                    propMgr = swModel.Extension.CustomPropertyManager[""];
                }
                else
                {
                    ConfigurationManager configMgr = swModel.ConfigurationManager;
                    Configuration config = configMgr.ActiveConfiguration;
                    propMgr = config.CustomPropertyManager;
                }

                propMgr.Set2(Name, Value);
            }
        }

        public event PropertyChangedEventHandler PropertyChanged;
        protected void OnPropertyChanged([CallerMemberName] string propertyName = null)
        {
            PropertyChanged?.Invoke(this, new PropertyChangedEventArgs(propertyName));
        }
    }
}
해당 코드에서 주서로 내용을 나누어놨는데, 그 내용을 살펴보자
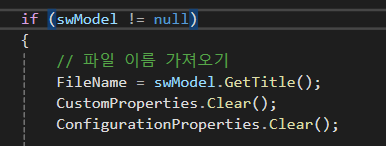
데이터 영역
        // 데이터 영역
        private string _fileName;
        public string FileName
        {
            get { return _fileName; }
            set { _fileName = value; OnPropertyChanged(); }
        }

        private ObservableCollection<PropertyItem> _customProperties;
        public ObservableCollection<PropertyItem> CustomProperties
        {
            get { return _customProperties; }
            set { _customProperties = value; OnPropertyChanged(); }
        }

        private ObservableCollection<PropertyItem> _configurationProperties;
        public ObservableCollection<PropertyItem> ConfigurationProperties
        {
            get { return _configurationProperties; }
            set { _configurationProperties = value; OnPropertyChanged(); }
        }
이 부분은 사용할 데이터에 관한 부분이다.
예를 들어 FileName은 프로그램 상에 파일 이름이 표시될 공간에 사용할 데이터다.
이미지로 보여주자면 다음과 같다.
그런데 왜 FileName 변수가 _fileName까지 합쳐서 총 2번 선언되어 있는지 궁금할 수 있는데
_fileName은 클래스 내부에서만 접근이 가능하며 데이터가 실제로 저장되는 공간의 역할을 하며
FileName은 _fileName을 UI에 노출시키고 만약 어떠한 사유로든 값이 변경되었을때, 그 사실을 알리기 위한 역할이다.
즉 _fileName은 데이터를 보관하기 위한 곳이고 FileName은 데이터가 변경되었을때 그 사실을 알리기 위한 속성이다.
따라서, 프로그램 내부 (백엔드)에서 사용할 값과 외부(프론트엔드) 가 사용할 값 2개를 쓴다고 생각하면 된다.
자, 이제 CustomProperties와 ConfigurationProperties를 살펴보자
이것들의 값은 각각 사용자 속성 값과 설정 속성 값이다.
그런데 fileName과는 코드 선언 형태가 다른데
이는 fileName은 하나의 데이터만 저장되는 반면
CustomProperties와 ConfigurationProperties는 여러개의 데이터를 저장하기 때문이다.
당장 프로그램만 봐도 fileName에는 오직 현재 열린 파일의 이름 하나만 이름이 나타나있고
사용자 속성과 설정 속성에는 데이터가 여러개가 들어와 있는 것을 알 수 있다.
여기서 Property는 사용자 정의와 설정 속성으로 2개가 있기 때문에 2개를 만들었다.
커멘드 영역
커멘드 영역은 뷰모델에서 뷰에 이벤트를 전달하는 용도로 사용한다.
public ICommand RefreshCommand { get; } // 생성자
public VM_MainFunction()
{
RefreshCommand = new RelayCommand(GetProperties);
// 나머지 생략
}
생성된 커멘드를 생성자에서 RelayCommand를 통해 전달해준다.
이때 전달되는 것은 GetProperties 함수다.
사실 생성자 내부를 보면 GetProperties()가 한번 더 있는것을 알 수 있는데
이는 창이 나타났을때 이벤트를 한 번 더 실행하라는 의미이다.
즉, GetProperties 이벤트는 창이 처음 열렸을 때 한번, 그리고 새로고침 버튼을 누를 때 마다 실행된다.
PropertyItem 클래스
전달될 데이터에 대한 부분으로 매우 중요한 부분 중 하나다.
코드를 하나하나 살펴보자
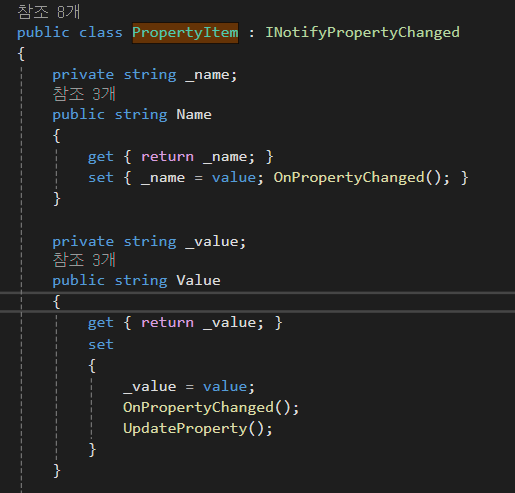
우선 코드의 윗부분을 살펴보자
이 부분은 Name과 Value로 구성되어 있다.
앞서 설명한 바와 같이 _name은 프로그램 내부에 저장되는 값이며
때문에 Name은 _name의 값을 가져온다.
새로 값이 할당될 때는 할당된 값을 _name에 할당하되 OnPropertyChanged 이벤트 (값이 변경되었음을 알리는 함수)도 같이 작동시킨다.
Value의 경우도 비슷해보이나 OnPropertyChanged 함수 뿐만 아니라 UpdateProperty 함수도 같이 사용하는 것을 알 수 있다.
UpdateProperty 함수는 무엇일까?
이건 솔리드웍스에 값을 업데이트 할 것을 지시하는 부분이다.
그러나 이 단락에서는 코드의 구조를 살펴보는 것이 주 목적이었기 때문에
이 부분에 대해서는 다음 단락에 대해 다루도록 하겠다.
5. 코드 기능 살펴보기
자, 가장 중요한 부분이다. API가 어떻게 작동하고 또 솔리드웍스 내의 데이터에 어떻게 접근하는지 알아보자
우선 GetProperties 함수다.
// 속성 가져오기 (사용자, 설정 둘 다)
private void GetProperties()
{
SldWorks swApp = new SldWorks();
ModelDoc2 swModel = (ModelDoc2)swApp.ActiveDoc;
if (swModel != null)
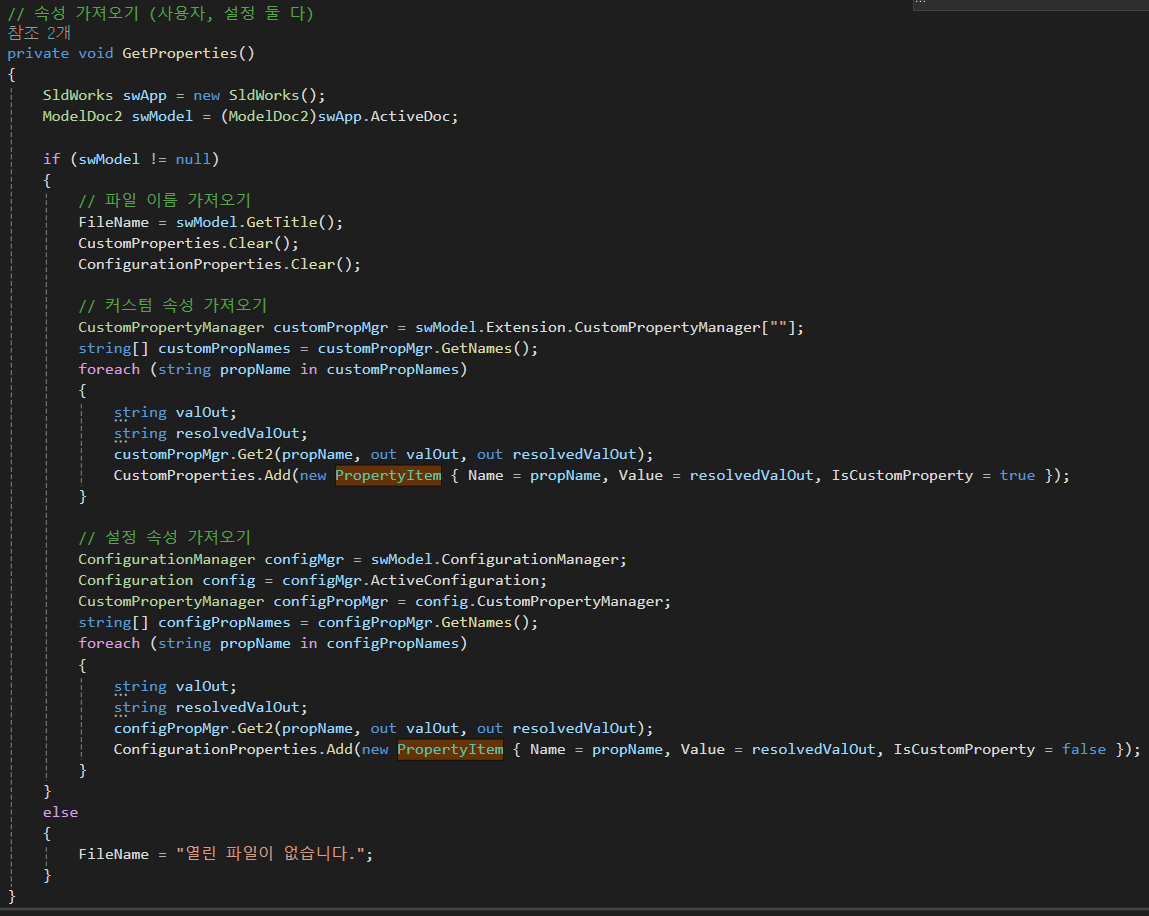
{
// 파일 이름 가져오기
FileName = swModel.GetTitle();
CustomProperties.Clear();
ConfigurationProperties.Clear();
// 커스텀 속성 가져오기
CustomPropertyManager customPropMgr = swModel.Extension.CustomPropertyManager[""];
string[] customPropNames = customPropMgr.GetNames();
foreach (string propName in customPropNames)
{
string valOut;
string resolvedValOut;
customPropMgr.Get2(propName, out valOut, out resolvedValOut);
CustomProperties.Add(new PropertyItem { Name = propName, Value = resolvedValOut, IsCustomProperty = true });
}
// 설정 속성 가져오기
ConfigurationManager configMgr = swModel.ConfigurationManager;
Configuration config = configMgr.ActiveConfiguration;
CustomPropertyManager configPropMgr = config.CustomPropertyManager;
string[] configPropNames = configPropMgr.GetNames();
foreach (string propName in configPropNames)
{
string valOut;
string resolvedValOut;
configPropMgr.Get2(propName, out valOut, out resolvedValOut);
ConfigurationProperties.Add(new PropertyItem { Name = propName, Value = resolvedValOut, IsCustomProperty = false });
}
}
else
{
FileName = "열린 파일이 없습니다.";
}
}
윗부분 부터 하나하나 살펴보자

SldWorks는 솔리드웍스 프로그램 자체를 의미한다.
SldWorks는 API 사용의 첫걸음이며, API에 접근하기 위해 가장 먼저 작성하게 되는 부분이다.
이 코드에서는 우선 솔리드웍스 프로그램 인터페이스를 새로 생성하고 있다.
이를 통해, 현재 열려있는 솔리드웍스와 직접 연결할 수 있다.
솔리드웍스에서 다루는 파일은 크게 부품, 어셈블리, 도면 이렇게 3개로 나뉘는데
이 3가지중 어떤것이라도 할당하기 위해서 ModelDoc2 키워드를 사용한다.
만약 어셈블리는 명시적으로 할당하고 싶다면 AssemblyDoc 키워드를, 부품을 명시적으로 할당하고 싶다면 PartDoc 키워드를, 도면을 명시적으로 할당하고 싶다면 DrawingDoc 키워드를 사용하면 된다.
자, 이제 ModelDoc2에 무엇을 할당할지 정해야 하는데 코드에서는 swApp.ActiveDoc 라고 되어있다.
이는 현재 솔리드웍스(swApp) 에서 활성화된 문서 (ActiveDoc)를 사용한다는 뜻이다.
앞에 (ModelDoc2) 가 있는데 이는 호환을 위해 데이터 타입을 변환해주기 위해 붙여둔 것이다.
(사실 없어도 큰 문제는 없지만 코드의 안정성을 위해 넣어준거다.)
여담
왜 ModelDoc2 키워드에 2가 붙었느냐고 생각할 수 있는데, 과거 ModelDoc는 과거 API 기능이 부실했던 때에 만들어진 것으로 여러가지 기능을 추가하면서 ModelDoc2 키워드를 사용하게 되었다. (단 ModelDoc 는 지금도 쓸 수는 있다.)
앞서 우리는 swModel에 "지금 열려져 있는 파일"을 할당바 있다.
그런데 만약 열려져 있는 파일이 없다면 swModel은 null이 될 것이고
이후의 모든 코드가 에러가 될 것이다.
이를 막기 위해 본 코드에서 swModel != null 조건을 추가하였다.
자 첫번째 기능이다.
열려져 있는 파일의 이름을 가져오자
FileName은 앞서 정의했던 그 변수들이다.
혹시나 해서 그 변수 코드를 다시 사진으로 넣으니 참조하기 바란다.
FileName = swModel.GetTitle();
swModel은 앞서 말했듯이 "지금 열려져있는 파일"을 뜻하고 GetTitle()메서드는 그 파일의 이름을 가져오는 기능을 수행한다.
자, 그런데 CustomProperties와 ConfigurationProperties에 대한 부분도 있다.
이 부분은 Clear()함수가 적용되어 있는데 이는 해당 내용을 모두 없앤다는 뜻이다.
여기서는 변수 내용을 모두 정리하고 새로 할당할 것이 때문에 없애는 코드를 넣어놨다.
파일이름을 가져오는 것은 너무 쉬웠으니 이번에는 속성 값들을 가져와보자
먼저 커스텀 속성이다.
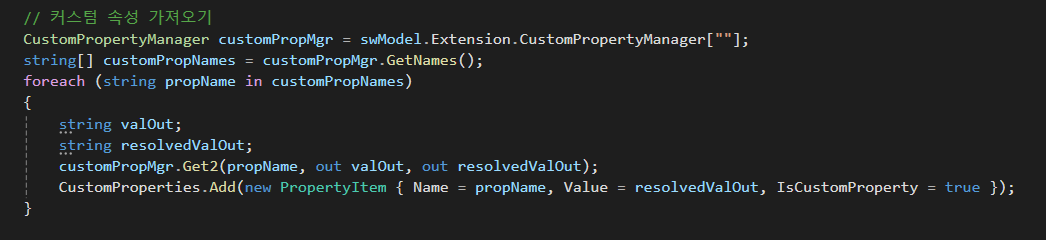
ConfigurationManager 가 바로 커스텀 속성을 가져오기 위한 키워드가
역시나 이곳에서도 swModel을 사용해서 값을 할당하고 있다.
Extension은 확장 기능을 위한 부분이다.
즉 커스텀 속성은 확장기능에 속하기 때문에 해당 메서드를 통해서만 접근할 수 있다.
참고로 확장 기능 중에는 다른 이름으로 저장 (SaveAs)도 있다.(심지어 이 키워드는 SaveAs3까지 있다.)
왜 굳이 이렇게 해놨는지는 웍스 개발자들만이 알것이다.
또한 [""]는 커스텀 속성의 기본 구성을 가져오기 위해 사용한다.
(사실 왜 굳이 [""]를 사용해야 하도록 해놨는지는 잘 모르겠다.)
아무튼 "열려있는 파일"의 "사용자 속성"을 가져와서 customPropMgr에 할당하였으니 이것을 데이터 그리드에 표시해보자
string[] customPropNames = customPropMgr.GetNames();
사용자 정의 속성의 이름들을 가져와 문자열 배열로 할당한 다음
      foreach (string propName in customPropNames)
      {
            string valOut;
            string resolvedValOut;
            customPropMgr.Get2(propName, out valOut, out resolvedValOut);
            CustomProperties.Add(new PropertyItem { Name = propName, Value = resolvedValOut, IsCustomProperty = true });
        }
그 이름들을 순회하면서 customPropMgr의 Get2메서드를 사용하여 값을 가져온다.
값을 가져온다음, 앞서 Clear 했던 CustomProperties에 새로운 요소로 추가한다.
이때 값과 벨류, IsCustomProperty 값이 추가된다.
그런데 CustomProperties는 앞서 View파일의 데이터 그리드에 바인딩 된 값이다.
즉, 여기에 값이 추가되면서 자동으로 데이터 그리드에 값이 올라간다.
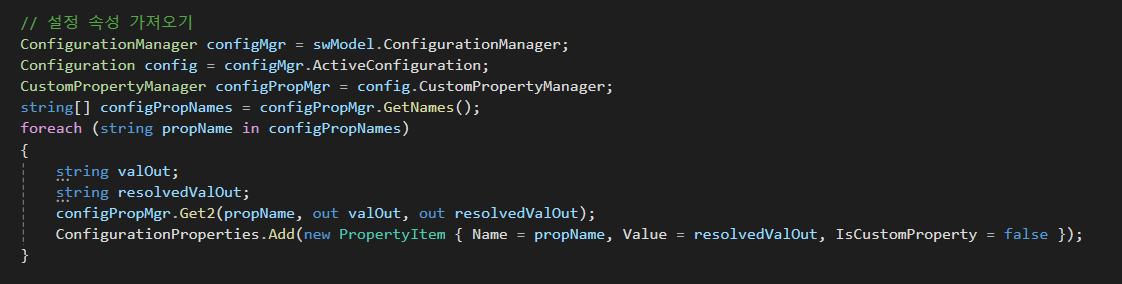
설정 속성도 크게 다르지 않지만 사용자 정의 속성이랑은 조금 차이점이 보이는데 이는 다음과 같다.
ConfigurationManager 이것은 솔리드웍스 모델의 모든 구성을 관리하는 키워드이고
Configuration은 솔리드웍스 모델의 특정 구성을 나타내기 위한 클래스다.
그리고 위의 사용자 속성 처럼 이름을 가져와서 찾는 방식으로 값을 가져오고 ConfigurationProperties에 할당한다.
일단 여기까지가 데이터를 가져오고 할당하는 부분이다.
이제 다음 UpdateProperty()로 가보자
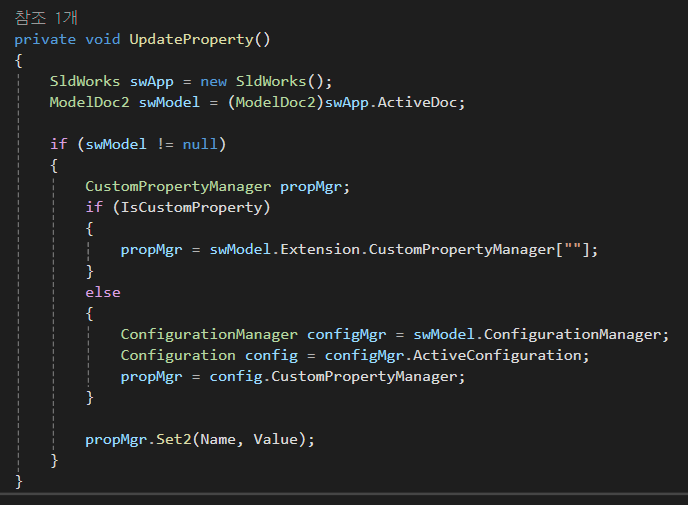
여기에도 어김없이 SldWorks 키워드와 ModelDoc2 키워드가 사용되고 있다.
IsCustomProperty는 변경된 값이 사용자 정의 값인지, 설정 속성 값인지를 구분하고 있고
실제 값을 할당하는 부분은 가장 아래 Set2 함수에 해당한다.
값을 가져올때 Get2 함수를 사용했으니 할당할 때는 Set2 함수를 사용하는 것이다.
6. API 자습하기
이번 글을 작성하면서 솔직히 후반부로 갈 수록 알아듣기 어렵고 설명이 부족하다는 것을 느꼈을 탠데
인벤터 API와 솔리드웍스 API를 사용해보면서
개인적으로는 솔리드웍스 API가 다소 복잡하고 난잡하게 잡혀있으며 설명도 부실한 부분이 많아
답정너 식으로 이해하는 방법 밖에 없었다.
(뿐만 아니라 같거나 거의 비슷한 기능임에도 불구하고 버전만 다른 키워드도 많다. 예를 들어 ModelDoc만 해도 ModelDoc, ModelDoc2, IModelDoc, IModelDoc2 가 있다.)
그래도 이번에 본 게시글에서 언급한 부분 말고도 알고자 하는 부분이 있을 것이고
보다 다양한 기능을 API를 통해 사용하고 싶은 사람들을 위해 API 정보를 얻는 방법에 대해 간단히 서술하고 글을 마치겠다.
Welcome - 2023 - SOLIDWORKS API Help
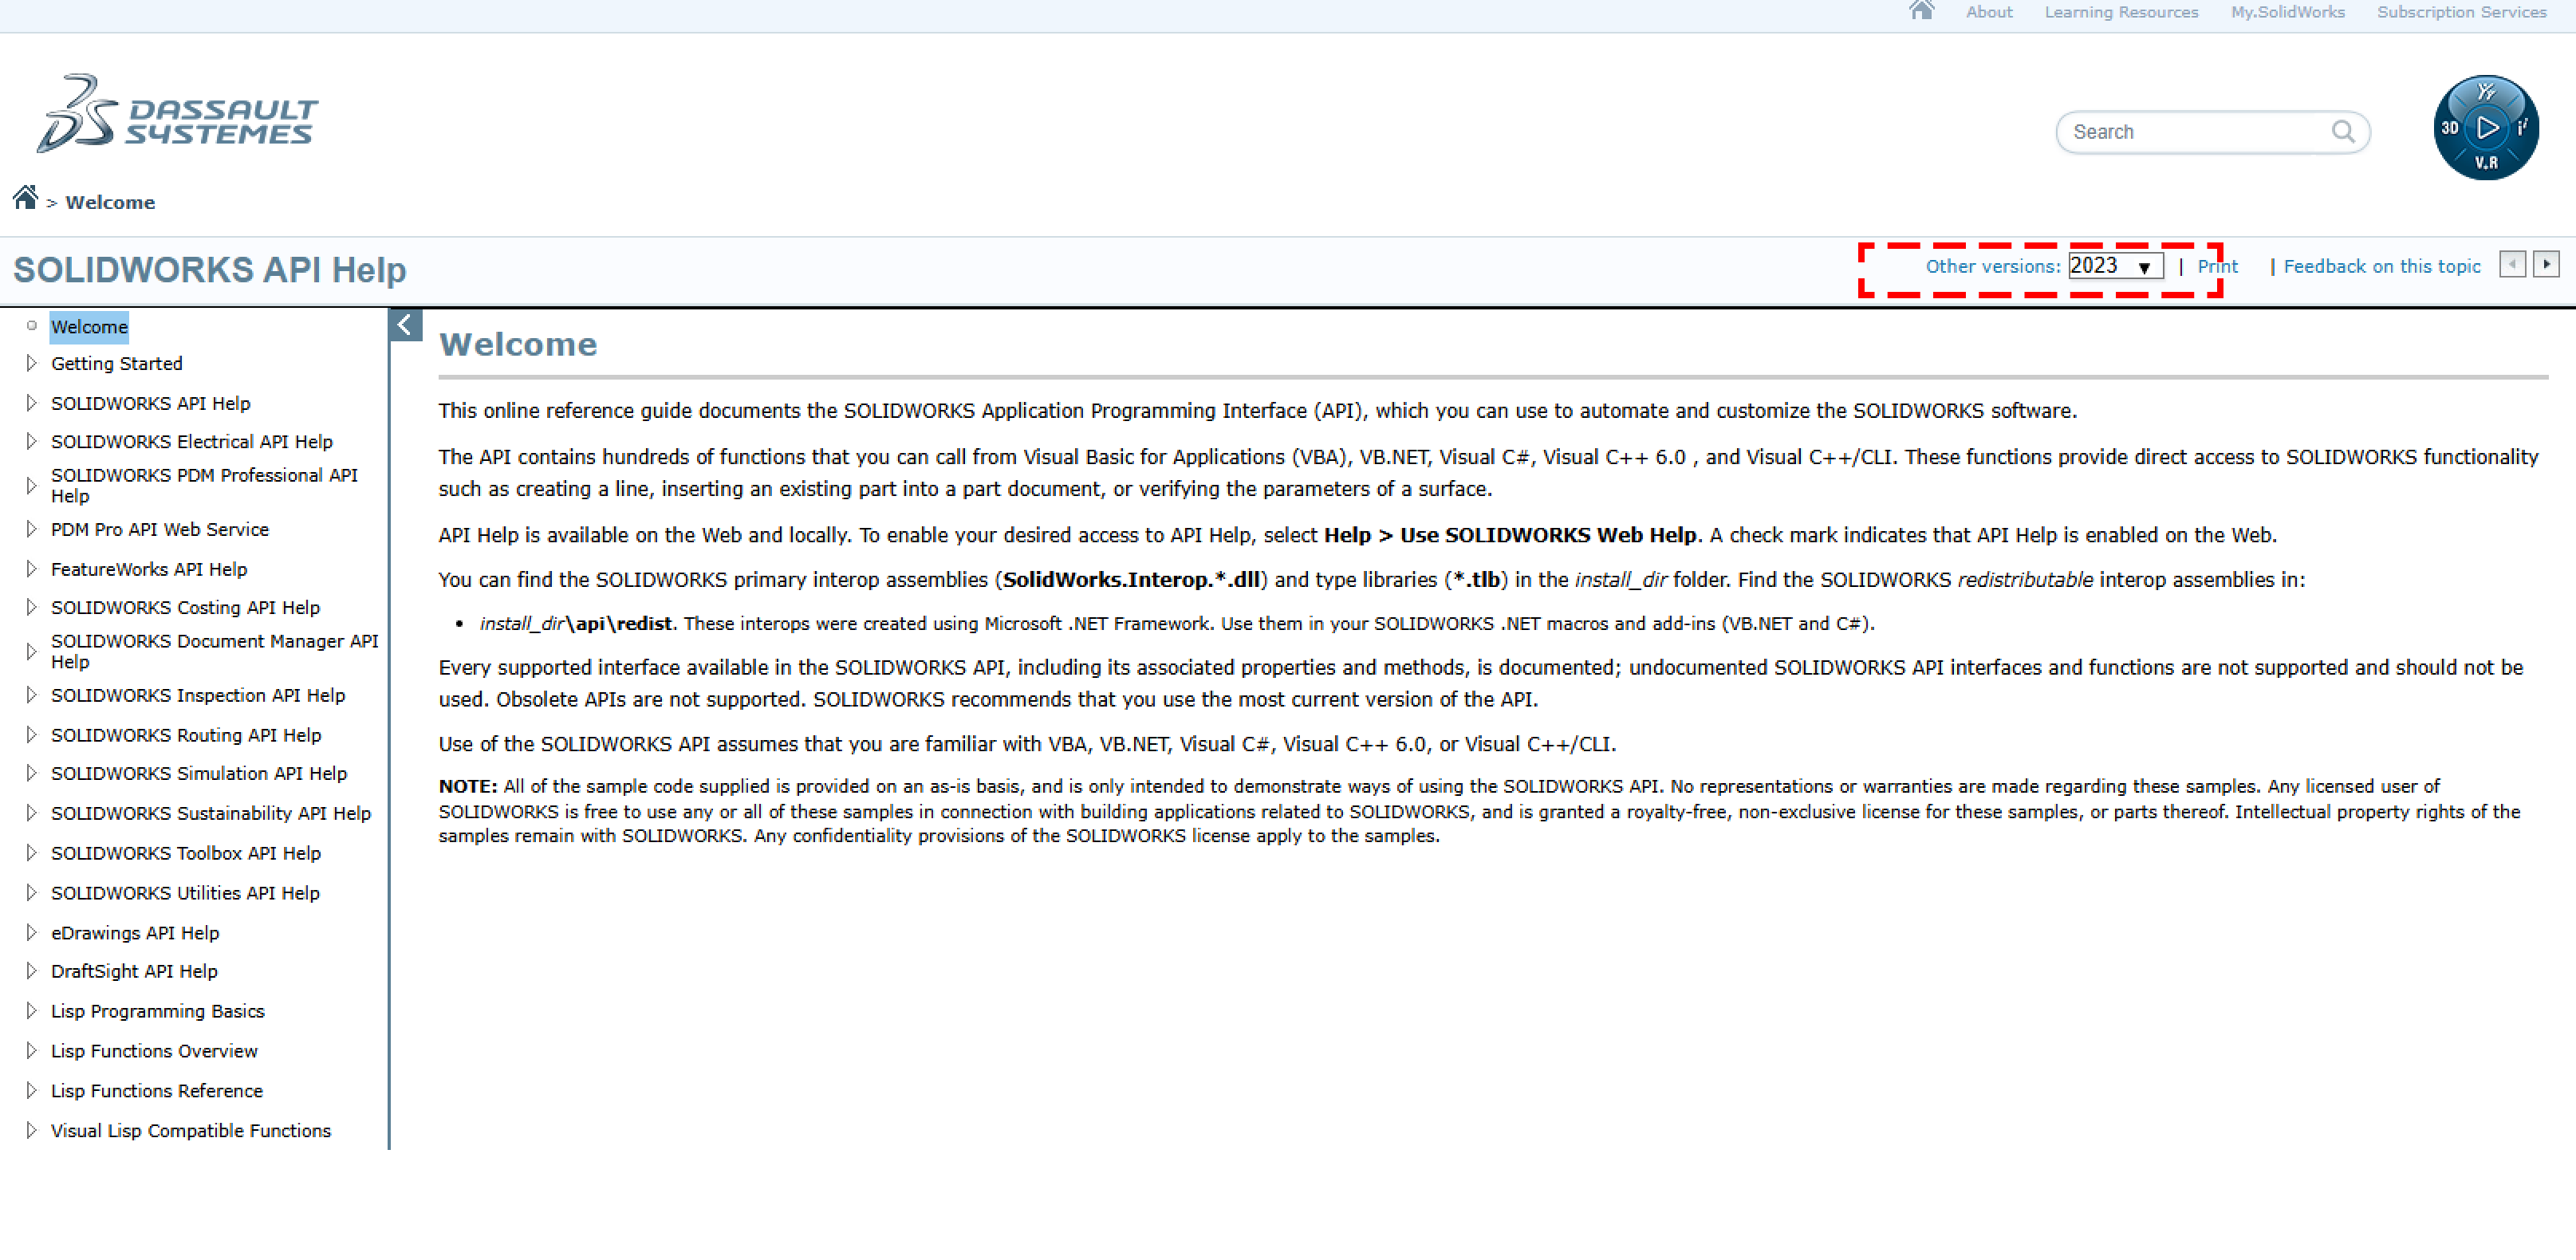
이는 API 도움말 문서이다.
영어밖에 없기 때문에 브라우저에서 필요에 따라 번역을 하도록 하고
우선 우측 체크박스의 버전을 선택하자
버전을 확인했으면 다음은 키워드다.
예를 들어, 지금까지 사용했던 ModelDoc2 키워드를 검색해보자
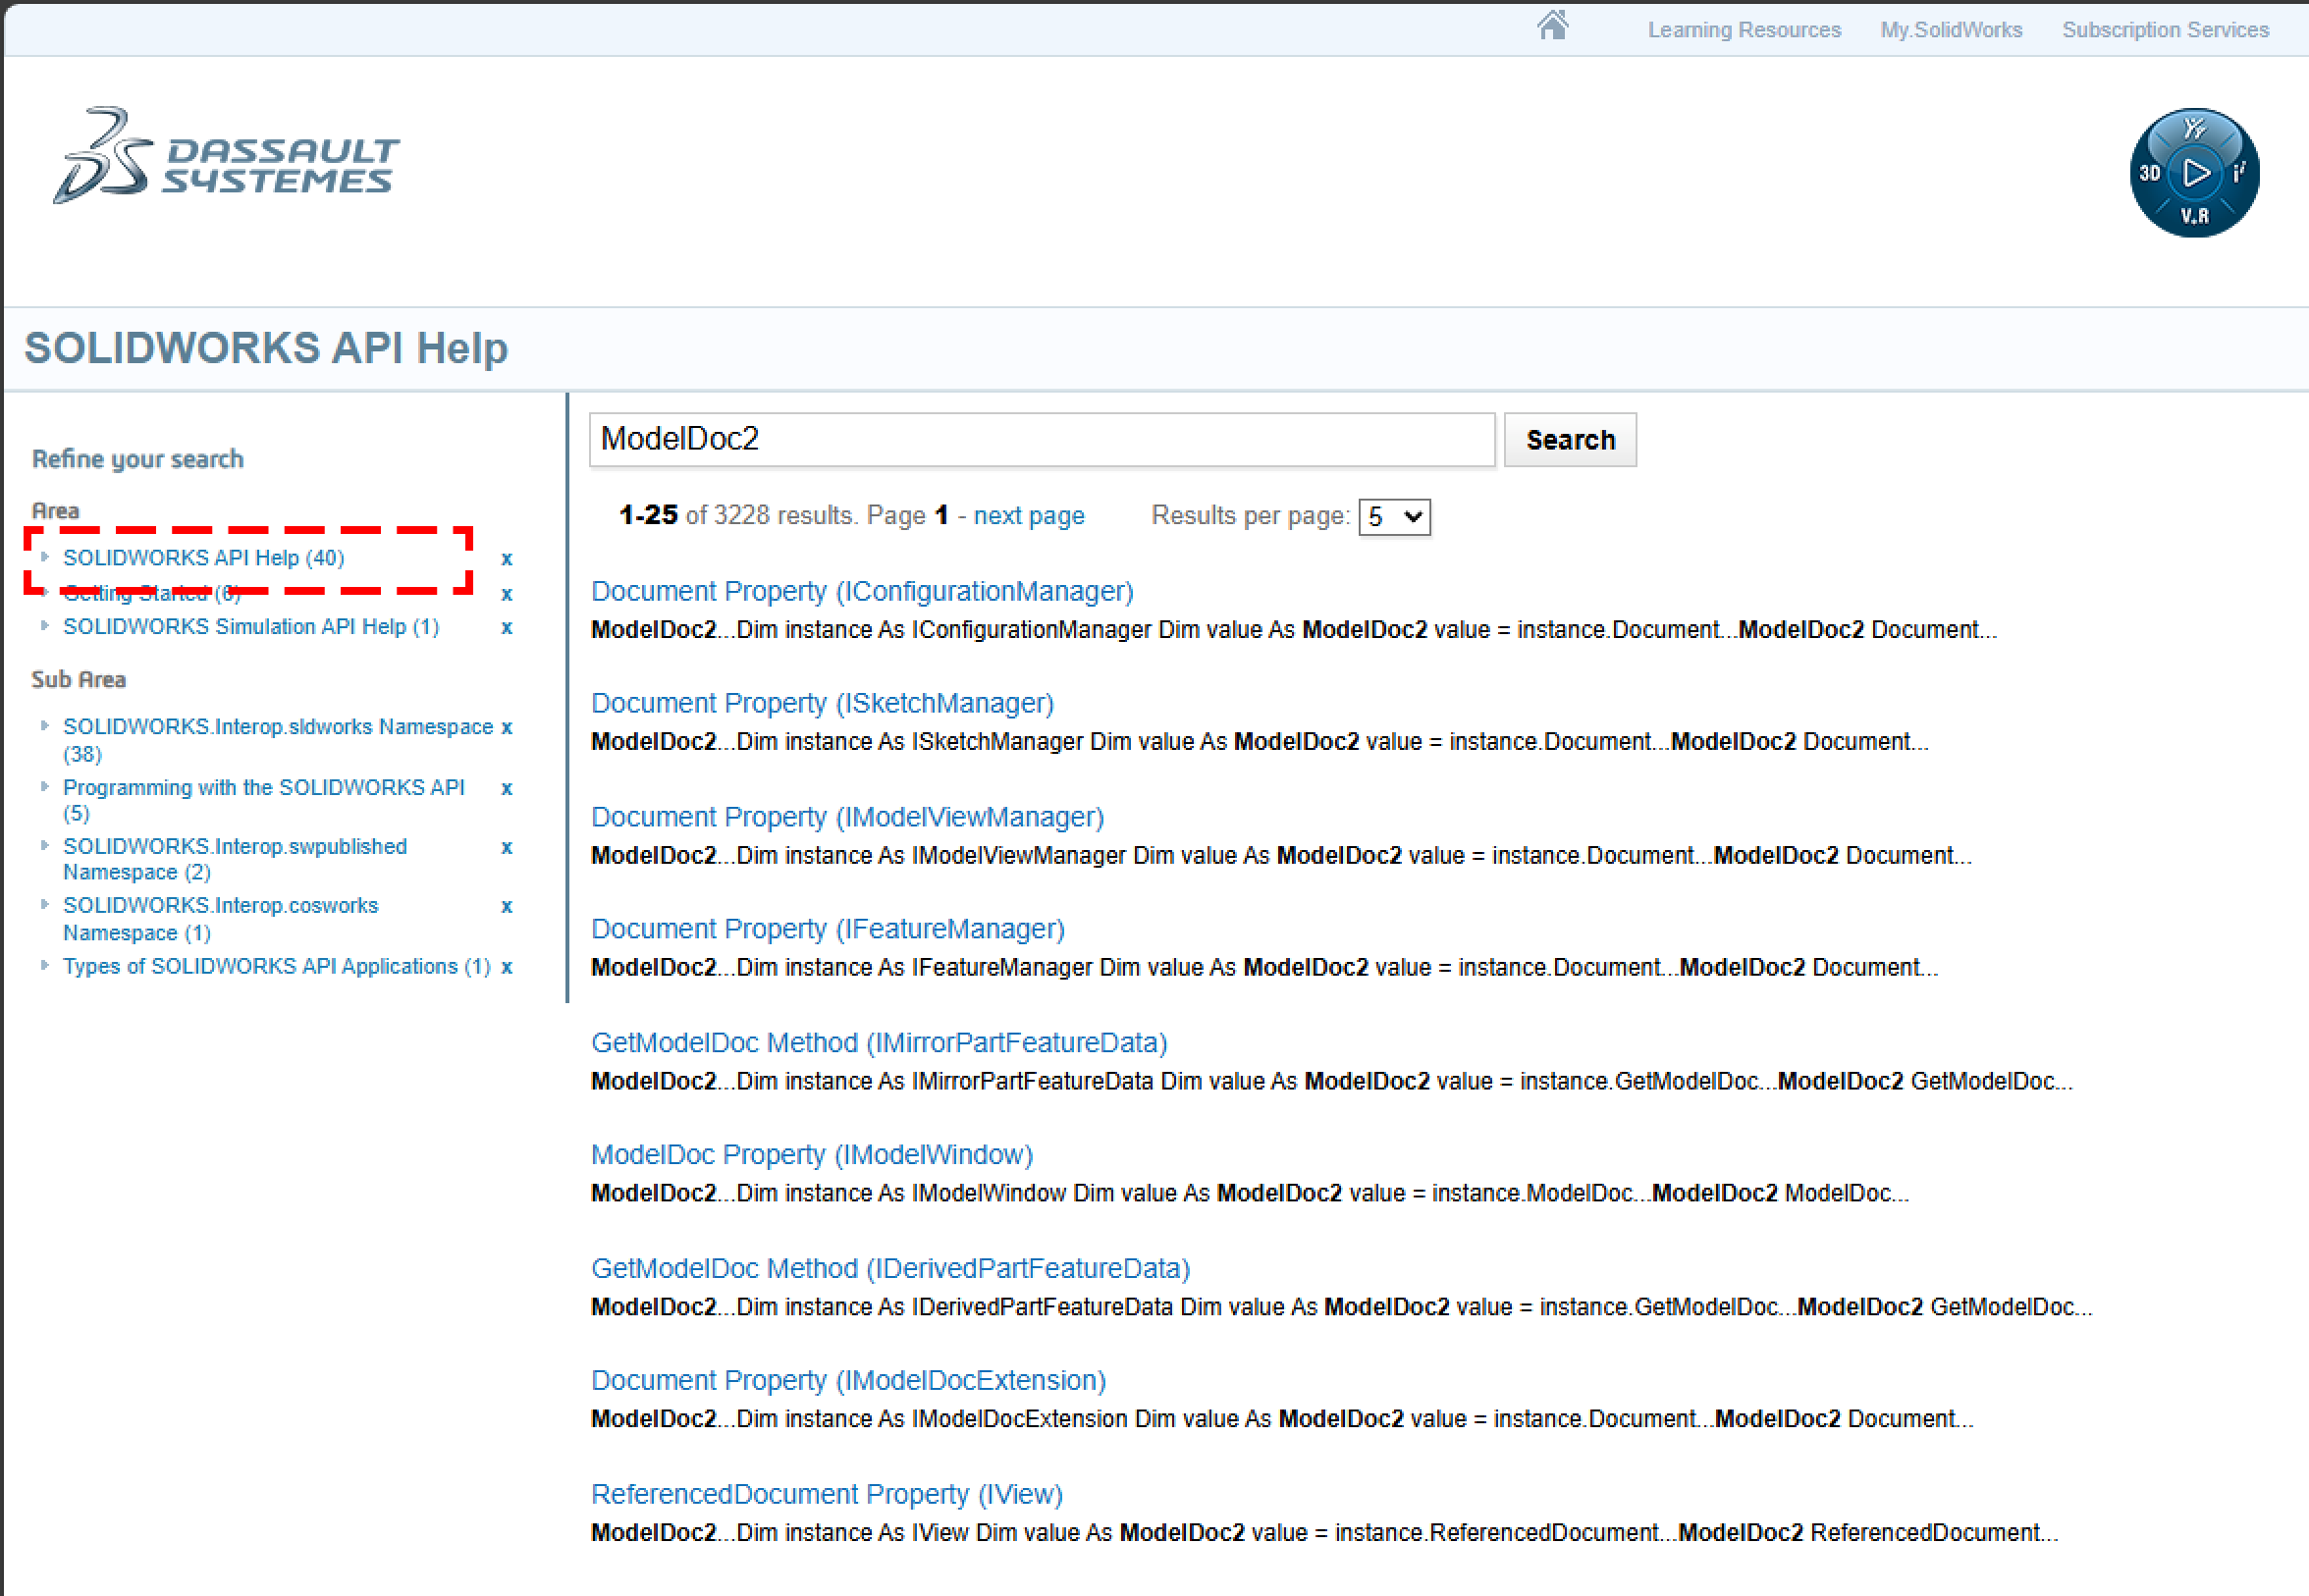
검색했으면 좌측의 API Help를 눌러서 API 관련된 내용만 보자
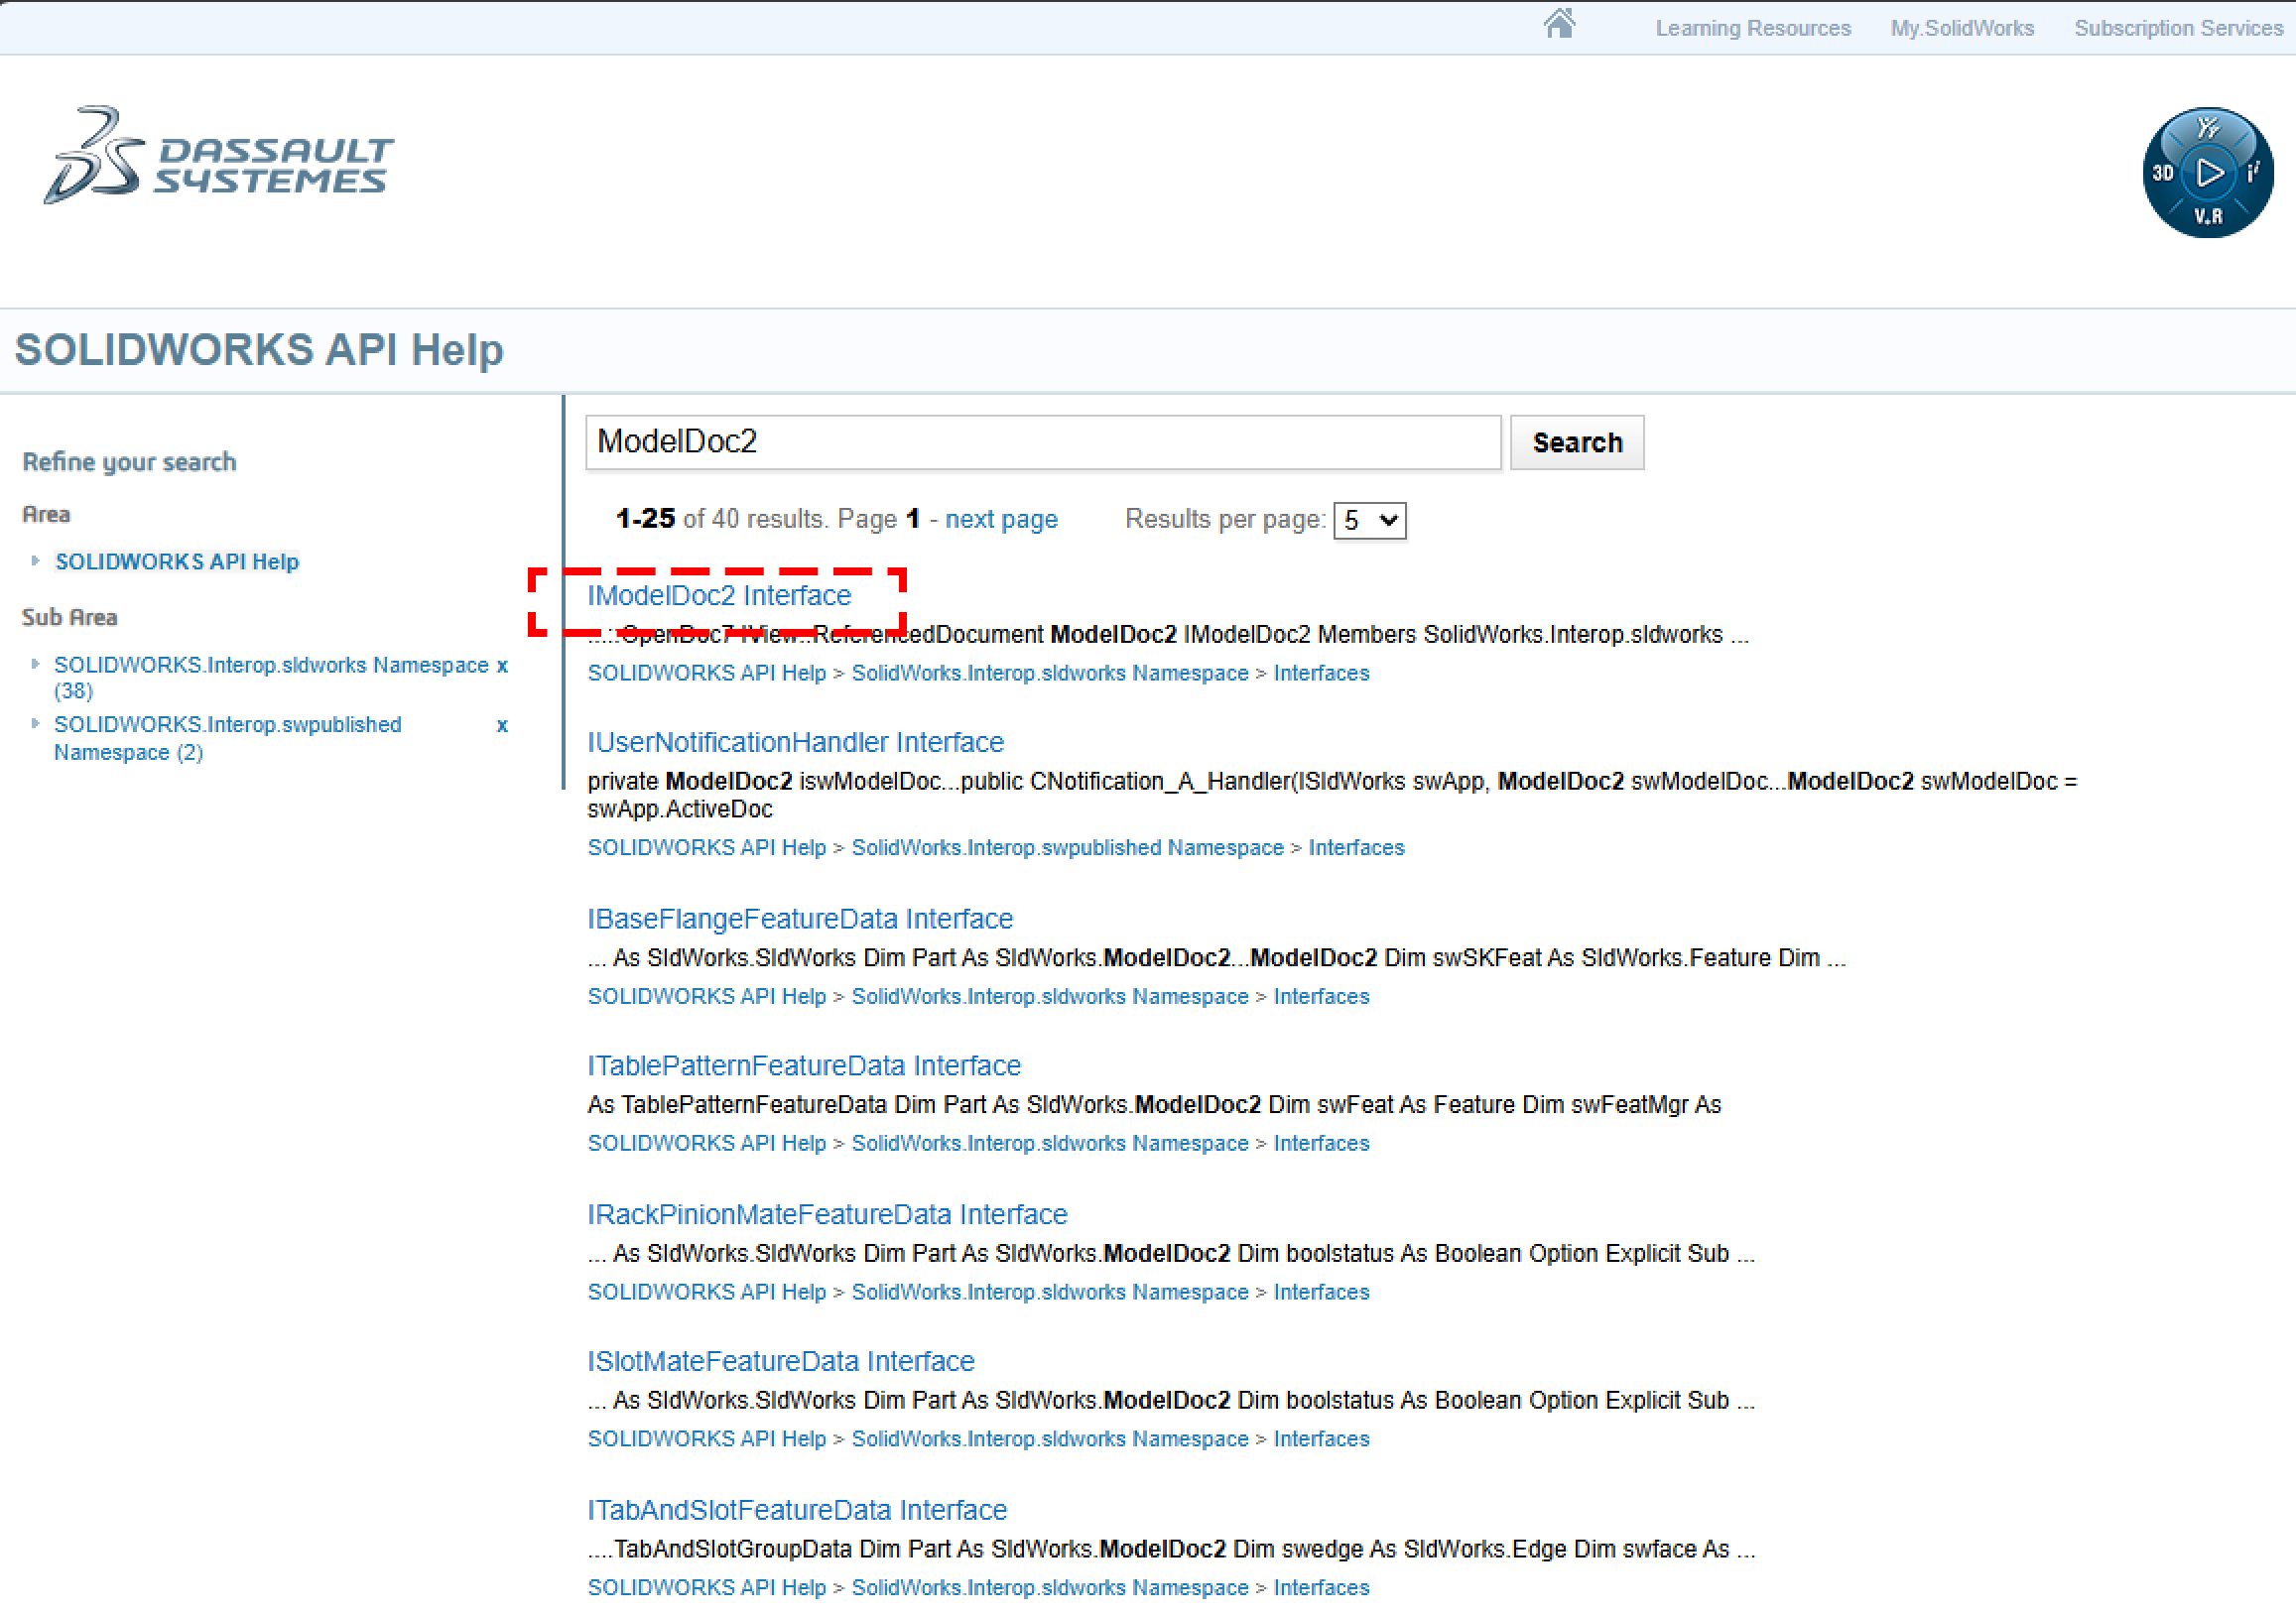
그러면 해당 키워드의 인터페이스 내용이 나올탠데 이것을 보면 된다.
그런데 ModelDoc2를 검색했는데 IModelDoc2 가 나온 이유는 ModelDoc2 키워드의 기능을 IModelDoc2 키워드가 대체했기 때문이라고 한다.
그러니까 ModelDoc2 키워드는 사용은 할 수 있어도 지원은 끝났고 앞으로는 IModelDoc2 키워드를 쓰라는 뜻이다.
뭐 이렇게 힘들게 해놨을까
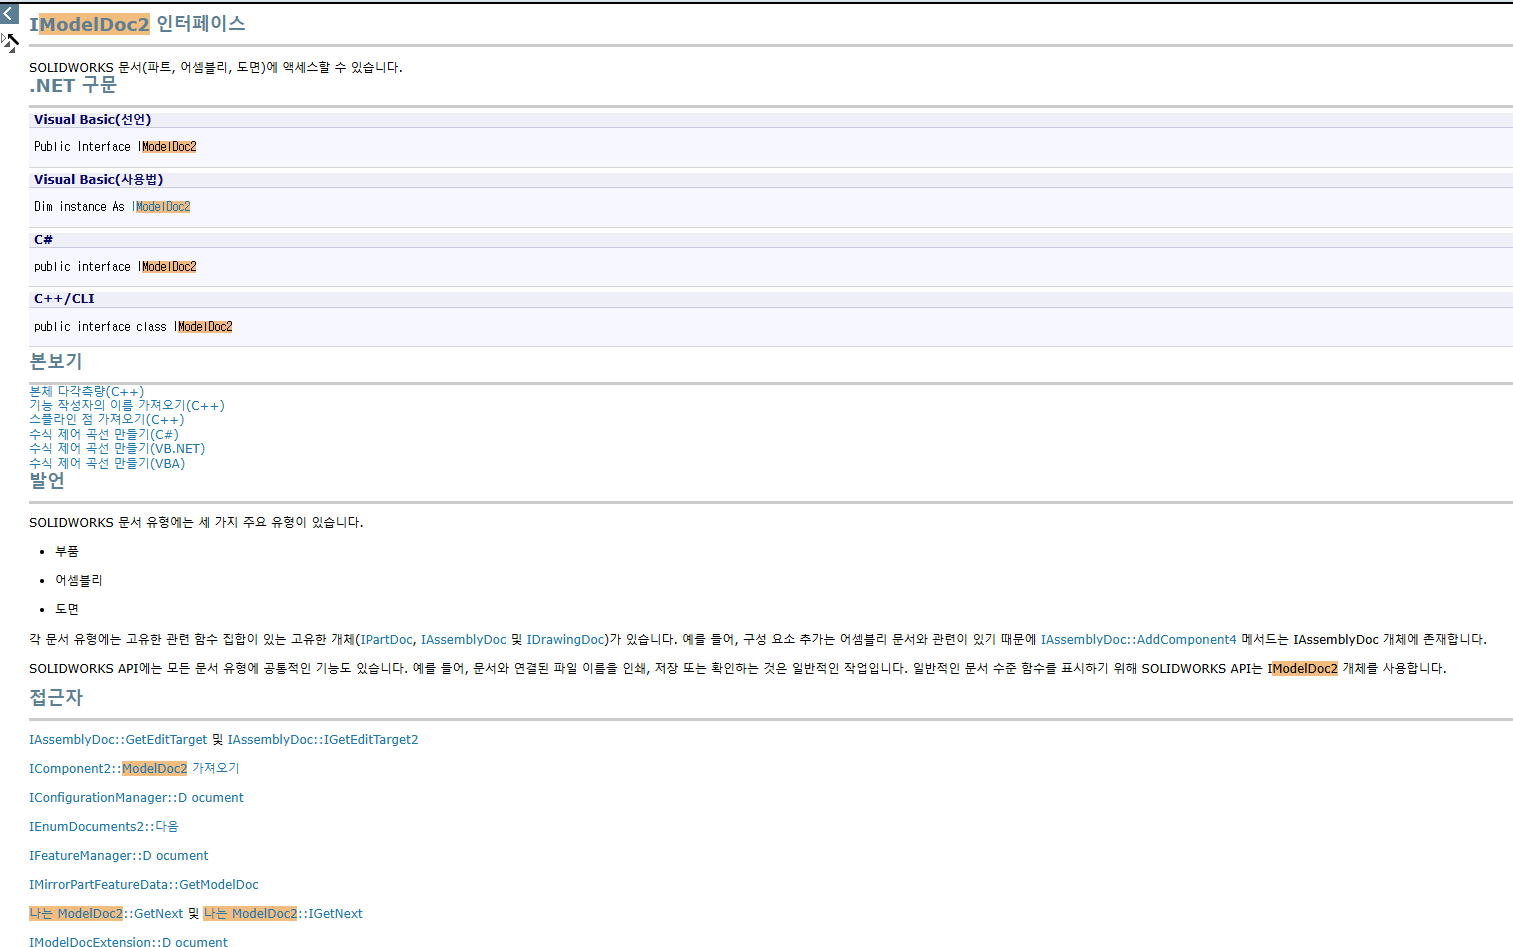
아무튼 검색해보면 이렇게 여러가지 내용이 있다.
본보기라고 번역된 부분은 예시를 말한다.
사용 방법과 예시등이 나와 있으니 해당 문서를 보고 공부하면 된다.
(그런데 사실 그마저도 불친절하기 그지없다. 그냥 아는 사람한테 물어보는게 더 빠를 수도 있다.)